

How to Set Up SSH Keys for GitHub: Step-by-Step Instructions

Search for a command to run...
No comments yet. Be the first to comment.
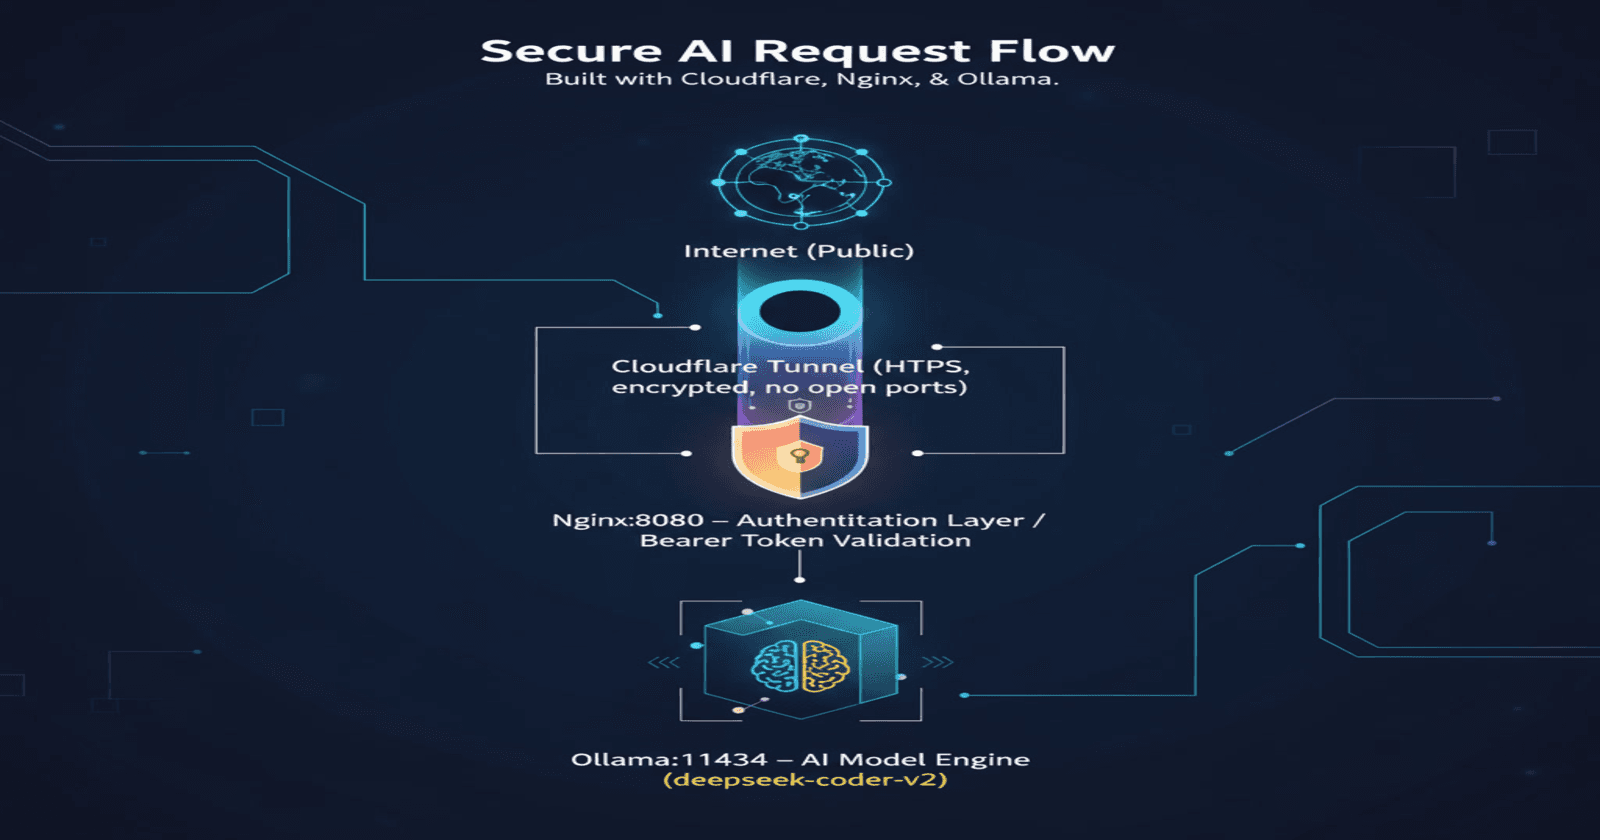
Let’s build a Secure Personal AI API with Ollama, Nginx, and Cloudflare Tunnel using oracle ubuntu instance Prerequisites and Target Audience ⚠️ Important Notice: This is not a beginner-friendly tutorial. This guide assumes you have practical, hands-...
Introduction Running applications on Oracle Cloud Infrastructure (OCI) requires more than just starting your server—you need a robust setup that ensures your services stay running, restart automatically after crashes, and survive system reboots. This...

Ever found yourself in one of these situations? "Can you check my website?" but your app is running on localhost:3000 Need to test webhooks from external services but they can't reach your local machine Want to show a client your work-in-progress ...

This article walks you through every single file required to get a secure, refresh-token-enabled JWT authentication system in NestJS with Prisma, bcrypt, Passport, and class-validator.Copy / paste the snippets in order and you will have a working pro...

Introduction to Amazon EC2 Compute refers to the processing power needed to run applications, manage data, and perform calculations. In the cloud, this power is available on-demand. You can access it remotely without owning or maintaining physical ha...
When working with GitHub, using SSH for authentication is a secure and efficient approach. Recently, I ran into an issue where my GitHub push attempts were met with a frustrating Permission denied (publickey) error. If you’re in the same boat, don’t worry! This article walks you through generating and adding an SSH key for GitHub, step by step.
First, let’s check if there are any existing SSH keys:
ls -al ~/.ssh
This command lists all the files in the .ssh directory. If you see files like id_rsa or id_ed25519, you likely already have SSH keys set up. In my case, the directory only contained authorized_keys and known_hosts, meaning no SSH key pair was available.
Since there was no key, I generated a new SSH key pair using the ED25519 algorithm, which is more secure and faster than RSA:
ssh-keygen -t ed25519 -C "your-email@example.com"
You’ll be prompted for a file location — just press Enter to accept the default (/home/yourusername/.ssh/id_ed25519). Then, enter a passphrase for added security (or leave it empty for convenience). Once done, you’ll see output like this:
Your identification has been saved in /home/yourusername/.ssh/id_ed25519
Your public key has been saved in /home/yourusername/.ssh/id_ed25519.pub
The SSH agent manages your SSH keys, so you don’t need to enter the passphrase every time. Start it like this:
eval "$(ssh-agent -s)"
You’ll see a message like Agent pid 54866, confirming the agent is running.
Now, add the private key to the agent:
ssh-add ~/.ssh/id_ed25519
If everything’s set up correctly, you won’t see any errors.
The next step is to add your public key (id_ed25519.pub) to GitHub. Display the key with this command:
cat ~/.ssh/id_ed25519.pub
Copy the output and go to your GitHub account:
Go to Settings → SSH and GPG keys.
Click New SSH key.
Paste the copied key and give it a name.
Click Add SSH key.
Let’s confirm everything works:
ssh -T git@github.com
If it’s successful, you’ll see a message like this:
Hi your-github-username! You've successfully authenticated.
Finally, try pushing your code again:
git push -u origin main
Everything should work perfectly now! 🎉
Final Thoughts Setting up SSH for GitHub takes a few steps, but once it’s done, you’ll have a secure and password-free way to manage your repositories. If you run into any snags, double-check your SSH agent, key permissions, and GitHub key settings.
Happy coding! 🚀