

Complete Guide: Running Production Services on Oracle Cloud with Systemd and Cloudflare Tunnel

Search for a command to run...
No comments yet. Be the first to comment.
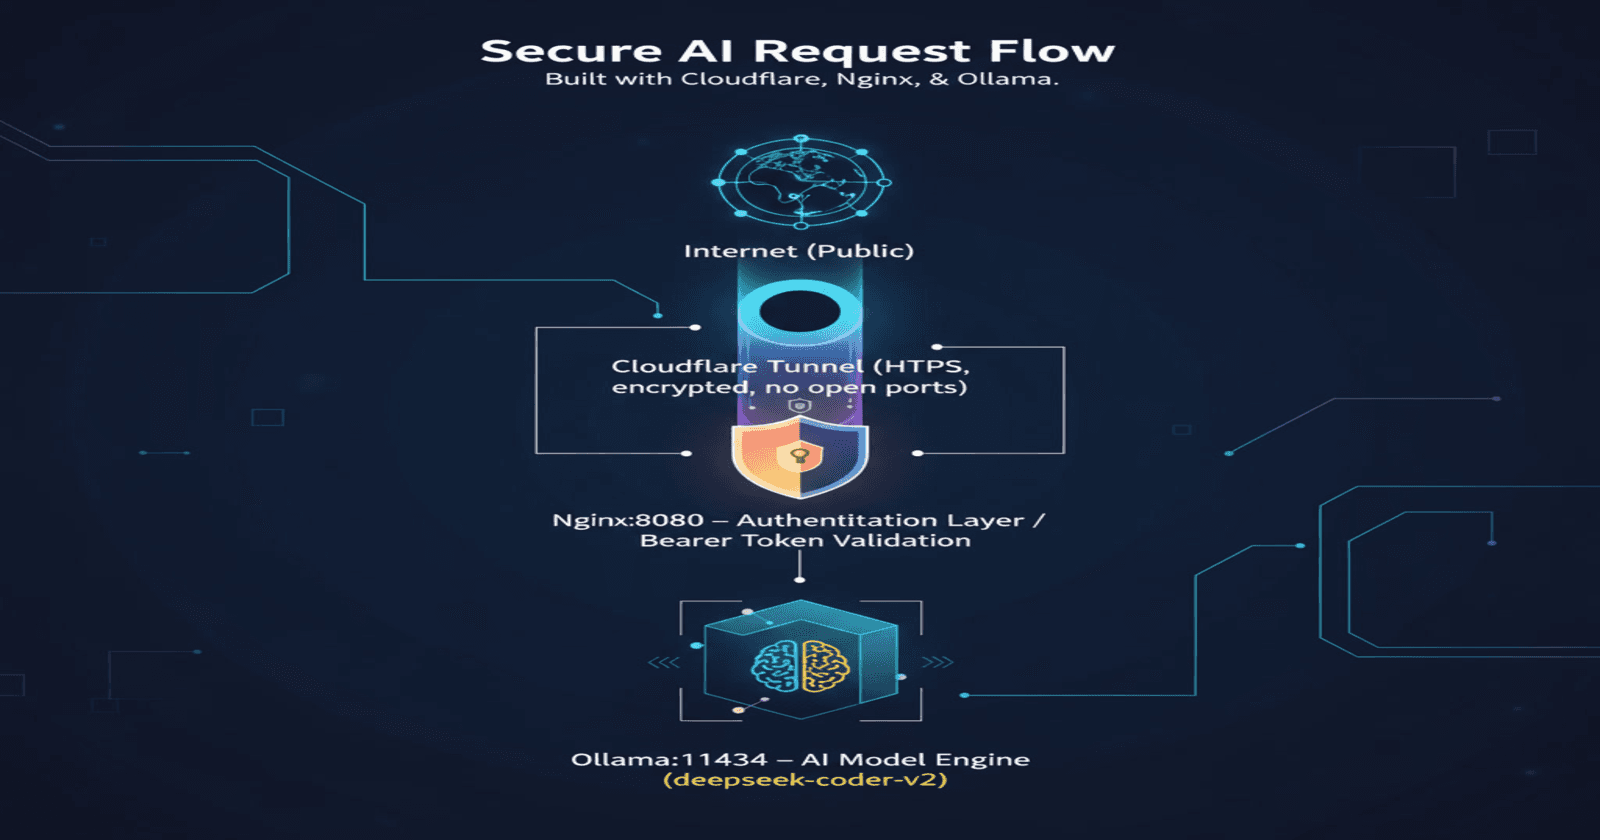
Let’s build a Secure Personal AI API with Ollama, Nginx, and Cloudflare Tunnel using oracle ubuntu instance Prerequisites and Target Audience ⚠️ Important Notice: This is not a beginner-friendly tutorial. This guide assumes you have practical, hands-...
Ever found yourself in one of these situations? "Can you check my website?" but your app is running on localhost:3000 Need to test webhooks from external services but they can't reach your local machine Want to show a client your work-in-progress ...

This article walks you through every single file required to get a secure, refresh-token-enabled JWT authentication system in NestJS with Prisma, bcrypt, Passport, and class-validator.Copy / paste the snippets in order and you will have a working pro...

Introduction to Amazon EC2 Compute refers to the processing power needed to run applications, manage data, and perform calculations. In the cloud, this power is available on-demand. You can access it remotely without owning or maintaining physical ha...
Running applications on Oracle Cloud Infrastructure (OCI) requires more than just starting your server—you need a robust setup that ensures your services stay running, restart automatically after crashes, and survive system reboots. This comprehensive guide walks you through setting up production-grade services using systemd, the industry-standard service manager for Linux systems.
Whether you're hosting a Node.js API, Python web application, or any other service on an Oracle Cloud compute instance, this guide will show you how to configure everything properly using systemd alongside Cloudflare Tunnel for secure external access.
Before diving into the technical setup, let's clarify what we mean by an "Oracle instance." In cloud computing terminology, an instance refers to a virtual machine (VM)—a virtualized server running on physical infrastructure maintained by the cloud provider.
Oracle Cloud Infrastructure calls these compute instances, similar to how:
Amazon Web Services calls them "EC2 instances"
Microsoft Azure calls them "Virtual Machines"
Google Cloud calls them "Compute Engine instances"
Your Oracle instance is essentially a server running in Oracle's data center that you can access remotely via SSH. It has its own:
Operating system (typically Ubuntu, CentOS, or Oracle Linux)
CPU and memory resources
Network interface and IP address
Storage volumes
When hosting a service on Oracle Cloud with external access, you typically need three components:
Your Application Server - The actual service you want to run (Node.js, Python, Go, etc.)
Cloudflare Tunnel - Securely exposes your application to the internet without opening firewall ports
Systemd - Manages both services, ensuring they run reliably
Cloudflare Tunnel creates a secure, encrypted connection between your Oracle instance and Cloudflare's edge network. This allows you to:
Expose services without opening firewall ports
Route traffic through a custom subdomain
Benefit from Cloudflare's DDoS protection and CDN
Avoid dealing with dynamic IP addresses
When you SSH into your Oracle instance and manually start your application:
bash
node server.js
Everything works fine—until you close your SSH connection. The moment you disconnect, your application stops running. Your subdomain becomes unreachable, and your service goes offline.
You could run it in the background with nohup or use screen/tmux, but these are development workarounds, not production solutions. They don't:
Auto-start your service when the VM reboots
Automatically restart your application if it crashes
Provide proper logging and monitoring
Follow industry best practices
This is where systemd becomes essential.
Systemd is the initialization system and service manager used by most modern Linux distributions, including Ubuntu (which commonly runs on Oracle Cloud instances). Think of it as the control center for all services running on your server.
If your Oracle instance reboots due to maintenance, updates, or unexpected issues, systemd automatically starts your services without any manual intervention. Your application comes back online automatically.
Applications crash—it's inevitable. With systemd, you can configure services to automatically restart when they fail, minimizing downtime to seconds rather than hours (or until you notice and SSH in to fix it).
Systemd integrates with journalctl, providing powerful, searchable logs for all your services. You can easily:
View real-time logs
Search through historical logs
Filter by time period
Export logs for analysis
You can set limits on CPU usage, memory consumption, and other resources to prevent runaway processes from crashing your entire instance.
Systemd can ensure services start in the correct order. For example, your Cloudflare tunnel should only start after your application is running.
Systemd is the expected way to manage services in production Linux environments. Any system administrator will know how to work with it.

Verdict: While screen, tmux, and nohup work for development and testing, systemd is the only proper solution for production environments.
Before proceeding with this guide, ensure you have:
Oracle Cloud Instance running Ubuntu (or another Linux distribution with systemd)
SSH access to your instance
Your application already developed and tested
Cloudflare Tunnel set up and configured (tunnel created, but not necessarily running)
sudo privileges on the instance
Before creating systemd service files, gather this information about your application:
Application type: Node.js, Python, Go, Java, Ruby, etc.
Start command: The exact command to start your application
Node.js: node server.js or npm start
Python: python3 app.py or flask run
Go: ./myapp (compiled binary)
Working directory: Full path where your application code lives
/home/ubuntu/tunnel-nodePort: Which port your application listens on
Environment variables: Any required environment variables
Systemd service files are stored in /etc/systemd/system/ and use the .service extension. Let's create one for your application.
bash
sudo nano /etc/systemd/system/myapp.service
Paste this configuration:
ini
[Unit]
Description=My Node.js Application
After=network.target

[Service]
Type=simple
User=ubuntu
WorkingDirectory=/home/ubuntu/your-app-folder (where is your application folder)
Environment="NODE_ENV=production"
Environment="PORT=3000"
ExecStart=/usr/bin/node server.js
Restart=always
RestartSec=10

# Optional: Resource limits
# MemoryLimit=512M
# CPUQuota=50%

# Logging
StandardOutput=journal
StandardError=journal
SyslogIdentifier=myapp

[Install]
WantedBy=multi-user.target
Understanding Each Section:
[Unit] Section:
Description: Human-readable name for your service
After=network.target: Ensures the service starts after the network is available
[Service] Section:
Type=simple: Service runs in the foreground
User=ubuntu: Run as the ubuntu user (adjust if different)
WorkingDirectory: Where your application files are located
Environment: Sets environment variables
ExecStart: The exact command to start your application
Restart=always: Always restart the service if it stops
RestartSec=10: Wait 10 seconds before restarting
StandardOutput/StandardError=journal: Send logs to journalctl
SyslogIdentifier: Name used in logs
[Install] Section:
WantedBy=multi-user.target: Start service when system reaches multi-user modeini
[Unit]
Description=My Python Application
After=network.target

[Service]
Type=simple
User=ubuntu
WorkingDirectory=/home/ubuntu/your-app-folder
Environment="PYTHONUNBUFFERED=1"
Environment="FLASK_ENV=production"
ExecStart=/usr/bin/python3 app.py
Restart=always
RestartSec=10

StandardOutput=journal
StandardError=journal
SyslogIdentifier=myapp

[Install]
WantedBy=multi-user.target
Note: PYTHONUNBUFFERED=1 ensures Python output appears in logs immediately.
ini
[Unit]
Description=My Application
After=network.target

[Service]
Type=simple
User=ubuntu
WorkingDirectory=/home/ubuntu/your-app-folder
ExecStart=/home/ubuntu/your-app-folder/myapp
Restart=always
RestartSec=10

StandardOutput=journal
StandardError=journal
SyslogIdentifier=myapp

[Install]
WantedBy=multi-user.target
Important: Replace /home/ubuntu/your-app-folder with your actual application directory path!
Save and exit: Press Ctrl+X, then Y, then Enter
Now let's create a service for Cloudflare Tunnel that will route external traffic to your application.
bash
sudo nano /etc/systemd/system/cloudflared-tunnel.service
Paste this configuration:
ini
[Unit]
Description=Cloudflare Tunnel
After=network.target myapp.service
Wants=myapp.service

[Service]
Type=simple
User=ubuntu
ExecStart=/usr/local/bin/cloudflared tunnel run my-oracle-tunnel
Restart=always
RestartSec=10

StandardOutput=journal
StandardError=journal
SyslogIdentifier=cloudflared

[Install]
WantedBy=multi-user.target
Key Configuration Details:
After=network.target myapp.service: Ensures the tunnel starts after your application
Wants=myapp.service: Systemd will try to start your app before the tunnel
ExecStart: Replace my-oracle-tunnel with your actual tunnel name
Finding Your Tunnel Name:
If you're unsure of your tunnel name:
bash
cloudflared tunnel list
Finding Cloudflared Location:
If cloudflared is installed elsewhere:
bash
which cloudflared
Update the ExecStart path accordingly.
Save and exit: Press Ctrl+X, then Y, then Enter
After creating the service files, systemd needs to reload its configuration and enable the services.
bash
# Reload systemd to recognize new services
sudo systemctl daemon-reload

# Enable services to start on boot
sudo systemctl enable myapp.service
sudo systemctl enable cloudflared-tunnel.service

# Start the services immediately
sudo systemctl start myapp.service
sudo systemctl start cloudflared-tunnel.service
What Each Command Does:
daemon-reload: Tells systemd to scan for new or modified service files
enable: Configures the service to start automatically on boot
start: Starts the service immediately
Check that both services are active and running correctly:
bash
# Check status of your application
sudo systemctl status myapp.service

# Check status of Cloudflare tunnel
sudo systemctl status cloudflared-tunnel.service
What to Look For:
You should see Active: active (running) in green text. Example output:
● myapp.service - My Node.js Application
     Loaded: loaded (/etc/systemd/system/myapp.service; enabled; vendor preset: enabled)
     Active: active (running) since Sat 2025-11-15 22:00:00 UTC; 2min ago
   Main PID: 1234 (node)
      Tasks: 11 (limit: 14273)
     Memory: 45.2M
        CPU: 250ms
     CGroup: /system.slice/myapp.service
             └─1234 /usr/bin/node server.js
Success Indicators:
Loaded: loaded - Service file is recognized
enabled - Will start on boot
Active: active (running) - Currently running
Main PID shows the process ID
No error messages
Now that your services are running, here are the commands you'll use regularly to manage them.
bash
# Start a service
sudo systemctl start myapp.service

# Stop a service
sudo systemctl stop myapp.service

# Restart a service (stop then start)
sudo systemctl restart myapp.service

# Reload service configuration without stopping
sudo systemctl reload myapp.service

# Check if service is running
sudo systemctl status myapp.service

# Enable service to start on boot
sudo systemctl enable myapp.service

# Disable service from starting on boot
sudo systemctl disable myapp.service

# Check if service is enabled
sudo systemctl is-enabled myapp.service

# Check if service is active
sudo systemctl is-active myapp.service
Systemd's logging system is incredibly powerful. Here's how to use it:
bash
# View logs in real-time (like tail -f)
sudo journalctl -u myapp.service -f

# View last 100 lines
sudo journalctl -u myapp.service -n 100

# View logs from today
sudo journalctl -u myapp.service --since today

# View logs since specific time
sudo journalctl -u myapp.service --since "2025-11-15 20:00:00"

# View logs between two times
sudo journalctl -u myapp.service --since "2025-11-15 20:00:00" --until "2025-11-15 22:00:00"

# View logs with priority level (error and higher)
sudo journalctl -u myapp.service -p err

# Export logs to file
sudo journalctl -u myapp.service > myapp-logs.txt

# View logs from both services simultaneously
sudo journalctl -u myapp.service -u cloudflared-tunnel.service -f
Log Priority Levels:
emerg (0): System unusable
alert (1): Action must be taken immediately
crit (2): Critical conditions
err (3): Error conditions
warning (4): Warning conditions
notice (5): Normal but significant
info (6): Informational
debug (7): Debug-level messages
bash
# See all enabled services
sudo systemctl list-unit-files | grep enabled

# See all running services
sudo systemctl list-units --type=service --state=running

# View service dependencies
sudo systemctl list-dependencies myapp.service

# Show all properties of a service
sudo systemctl show myapp.service

# Edit service file directly
sudo systemctl edit --full myapp.service

# Create override file (for modifications without editing main file)
sudo systemctl edit myapp.service
Even with proper configuration, you may encounter issues. Here's how to diagnose and fix them.
Symptoms:
Active: failed status
code=exited, status=1/FAILURE
Diagnosis:
bash
# Check detailed error logs
sudo journalctl -u myapp.service -n 50 --no-pager

# Verify the executable path
which node  # or python3, or check your binary path

# Check file permissions
ls -la /home/ubuntu/your-app-folder

# Try running the command manually
cd /home/ubuntu/your-app-folder
node server.js
Common Causes:
Wrong WorkingDirectory path
pwdMissing executable
sudo apt install nodejs)Incorrect file permissions
chmod +x your-binary or chown ubuntu:ubuntu -R /pathMissing dependencies
Node.js: npm install
Python: pip install -r requirements.txt
Syntax errors in code
Symptoms:
Service status shows activating (auto-restart)
Constant restart loop
Diagnosis:
bash
# Watch logs in real-time
sudo journalctl -u myapp.service -f

# Check application-specific logs
cat /home/ubuntu/your-app-folder/app.log
Common Causes:
bash
   # Check what's using the port
   sudo lsof -i :3000

   # Kill the process
   sudo kill <PID>
Missing environment variables
Environment=Application crashes on startup
Incorrect ExecStart command
Symptoms:
cloudflared-tunnel.service fails with "No such file or directory"Solution:
bash
# Find where cloudflared is installed
which cloudflared

# Update the service file with correct path
sudo nano /etc/systemd/system/cloudflared-tunnel.service
# Change ExecStart to the path returned by 'which'

# Reload and restart
sudo systemctl daemon-reload
sudo systemctl restart cloudflared-tunnel.service
Symptoms:
Logs show "Permission denied" errors
Service can't write to files or directories
Solution:
bash
# Change ownership of application directory
sudo chown -R ubuntu:ubuntu /home/ubuntu/your-app-folder

# Give execute permissions to binaries
chmod +x /home/ubuntu/your-app-folder/myapp

# Check what user the service runs as
sudo systemctl show myapp.service | grep User
Symptoms:
Both services show active (running)
Subdomain returns 502 Bad Gateway or connection timeout
Diagnosis:
bash
# Check if app is listening on the correct port
sudo netstat -tlnp | grep :3000

# Check Cloudflare tunnel logs
sudo journalctl -u cloudflared-tunnel.service -n 100

# Test local connectivity
curl http://localhost:3000
Common Causes:
Application not listening on correct host
0.0.0.0 or localhostCloudflare tunnel misconfigured
Firewall blocking connections
Solution - Add Resource Limits:
bash
sudo nano /etc/systemd/system/myapp.service
Add these lines in the [Service] section:
ini
# Limit memory to 512MB
MemoryLimit=512M

# Limit CPU to 50%
CPUQuota=50%

# Limit number of processes
TasksMax=50
Then reload:
bash
sudo systemctl daemon-reload
sudo systemctl restart myapp.service
Customize how systemd handles service failures:
ini
[Service]
# Only restart on failure (not clean exit)
Restart=on-failure

# Restart on any exit except clean stop
Restart=on-abnormal

# Restart on success or failure
Restart=always

# Never restart
Restart=no

# Wait before restarting
RestartSec=10

# Maximum restarts within time window
StartLimitIntervalSec=300
StartLimitBurst=5
Example: Restart maximum 5 times within 5 minutes, then give up:
ini
[Service]
Restart=on-failure
RestartSec=10
StartLimitIntervalSec=300
StartLimitBurst=5
ini
[Service]
Environment="NODE_ENV=production"
Environment="PORT=3000"
Environment="DATABASE_URL=postgresql://..."
Environment="API_KEY=your-key-here"

# Or load from file
EnvironmentFile=/home/ubuntu/your-app/.env
For security, you might want a dedicated user:
bash
# Create dedicated user
sudo useradd -r -s /bin/false myappuser

# Change ownership
sudo chown -R myappuser:myappuser /home/ubuntu/your-app-folder

# Update service file
[Service]
User=myappuser
Group=myappuser
Ensure correct startup order:
ini
[Unit]
# Start after these services
After=network.target postgresql.service redis.service

# Require these services (hard dependency)
Requires=postgresql.service

# Want these services (soft dependency)
Wants=redis.service
ini
[Service]
# Time to wait for service to start
TimeoutStartSec=60

# Time to wait for service to stop
TimeoutStopSec=30

# Send SIGKILL if stop timeout exceeded
KillMode=mixed
Never run services as root unless absolutely necessary:
ini
[Service]
User=ubuntu
Group=ubuntu
Instead of hardcoding secrets in service files:
bash
# Create environment file
sudo nano /home/ubuntu/your-app/.env
DATABASE_URL=postgresql://user:pass@host/db
API_KEY=secret-key-here
bash
# Secure the file
sudo chmod 600 /home/ubuntu/your-app/.env
sudo chown ubuntu:ubuntu /home/ubuntu/your-app/.env
Update service file:
ini
[Service]
EnvironmentFile=/home/ubuntu/your-app/.env
ini
[Service]
# Make /home, /root, /run/user read-only
ProtectHome=read-only

# Make /usr, /boot, /efi read-only
ProtectSystem=strict

# Only allow writing to specific directories
ReadWritePaths=/home/ubuntu/your-app/logs
ini
[Service]
# Only allow IPv4
RestrictAddressFamilies=AF_INET

# Block all except specific ports
IPAddressDeny=any
IPAddressAllow=localhost
IPAddressAllow=10.0.0.0/8
Prevent logs from filling up your disk:
bash
# Check journal disk usage
journalctl --disk-usage

# Limit journal size
sudo nano /etc/systemd/journald.conf
Add:
ini
[Journal]
SystemMaxUse=500M
SystemMaxFileSize=100M
Restart journald:
bash
sudo systemctl restart systemd-journald
Set up email alerts for service failures:
ini
[Unit]
OnFailure=status-email@%n.service

[Service]
# Your service configuration
Create a monitoring script:
bash
#!/bin/bash
# check-services.sh

SERVICES=("myapp.service" "cloudflared-tunnel.service")

for service in "${SERVICES[@]}"; do
    if ! systemctl is-active --quiet "$service"; then
        echo "$service is not running!"
        # Send alert (email, Slack, etc.)
    fi
done
Run via cron every 5 minutes:
bash
crontab -e
Add:
*/5 * * * * /home/ubuntu/check-services.sh
For faster deployment, here's an automated setup script:
bash
#!/bin/bash
# setup-services.sh

# Configuration - EDIT THESE
APP_NAME="myapp"
APP_DIR="/home/ubuntu/tunnel-node"
APP_TYPE="node"  # node, python, or binary
APP_COMMAND="node server.js"
APP_PORT="3000"
TUNNEL_NAME="my-oracle-tunnel"

echo "Setting up systemd services..."

# Create application service
sudo tee /etc/systemd/system/${APP_NAME}.service > /dev/null <<EOF
[Unit]
Description=${APP_NAME} Application
After=network.target

[Service]
Type=simple
User=ubuntu
WorkingDirectory=${APP_DIR}
Environment="NODE_ENV=production"
Environment="PORT=${APP_PORT}"
ExecStart=/usr/bin/${APP_COMMAND}
Restart=always
RestartSec=10

StandardOutput=journal
StandardError=journal
SyslogIdentifier=${APP_NAME}

[Install]
WantedBy=multi-user.target
EOF

# Create Cloudflare tunnel service
sudo tee /etc/systemd/system/cloudflared-tunnel.service > /dev/null <<EOF
[Unit]
Description=Cloudflare Tunnel
After=network.target ${APP_NAME}.service
Wants=${APP_NAME}.service

[Service]
Type=simple
User=ubuntu
ExecStart=/usr/local/bin/cloudflared tunnel run ${TUNNEL_NAME}
Restart=always
RestartSec=10

StandardOutput=journal
StandardError=journal
SyslogIdentifier=cloudflared

[Install]
WantedBy=multi-user.target
EOF

# Reload systemd
echo "Reloading systemd..."
sudo systemctl daemon-reload

# Enable services
echo "Enabling services..."
sudo systemctl enable ${APP_NAME}.service
sudo systemctl enable cloudflared-tunnel.service

# Start services
echo "Starting services..."
sudo systemctl start ${APP_NAME}.service
sudo systemctl start cloudflared-tunnel.service

# Show status
echo ""
echo "========================================="
echo "Service Status:"
echo "========================================="
sudo systemctl status ${APP_NAME}.service
echo ""
sudo systemctl status cloudflared-tunnel.service

echo ""
echo "Setup complete!"
echo "Check logs with: sudo journalctl -u ${APP_NAME}.service -f"
Make it executable and run:
bash
chmod +x setup-services.sh
./setup-services.sh
After everything is configured, test thoroughly:
bash
# Start both services
sudo systemctl start myapp.service cloudflared-tunnel.service

# Verify they're running
sudo systemctl status myapp.service

# Exit SSH
exit

# Reconnect and check
ssh ubuntu@your-instance-ip
sudo systemctl status myapp.service
Both services should still be running.
bash
# Find the process ID
sudo systemctl status myapp.service | grep "Main PID"

# Kill the process
sudo kill -9 <PID>

# Wait a few seconds and check status
sleep 15
sudo systemctl status myapp.service
The service should have automatically restarted.
bash
# Reboot the instance
sudo reboot

# After it comes back up, SSH in and check
ssh ubuntu@your-instance-ip
sudo systemctl status myapp.service cloudflared-tunnel.service
Both services should be running automatically.
bash
# From your local machine
curl https://your-subdomain.your-domain.com

# Should return your application's response
For applications that take time to initialize:
ini
[Service]
# Give app 2 minutes to start
TimeoutStartSec=120

# Wait 30 seconds before restarting
RestartSec=30

# If it fails 3 times in 5 minutes, stop trying
StartLimitIntervalSec=300
StartLimitBurst=3
ini
[Service]
# Limit memory
MemoryMax=1G
MemoryHigh=800M

# Limit CPU
CPUQuota=75%

# Set CPU scheduling priority (higher = lower priority)
Nice=10

# Set I/O scheduling priority
IOSchedulingClass=best-effort
IOSchedulingPriority=4
ini
[Service]
# Don't wait for all "After" services
# DefaultDependencies=no  # Use carefully!

# Reduce startup timeout
TimeoutStartSec=30
bash
# Create backup directory
mkdir -p ~/systemd-backups

# Copy service files
sudo cp /etc/systemd/system/myapp.service ~/systemd-backups/
sudo cp /etc/systemd/system/cloudflared-tunnel.service ~/systemd-backups/

# Backup with date
sudo cp /etc/systemd/system/myapp.service ~/systemd-backups/myapp.service.$(date +%Y%m%d)
bash
# On old instance - export configurations
tar -czf services-backup.tar.gz \
    /etc/systemd/system/myapp.service \
    /etc/systemd/system/cloudflared-tunnel.service \
    /home/ubuntu/your-app-folder

# Transfer to new instance
scp services-backup.tar.gz ubuntu@new-instance-ip:~

# On new instance - restore
tar -xzf services-backup.tar.gz -C /
sudo systemctl daemon-reload
sudo systemctl enable myapp.service cloudflared-tunnel.service
sudo systemctl start myapp.service cloudflared-tunnel.service
Setting up systemd for production services on Oracle Cloud Infrastructure transforms your deployment from fragile to robust. You've learned:
Why systemd is essential for production environments
How to create service files for your application and Cloudflare Tunnel
Essential commands for managing and monitoring services
Troubleshooting techniques for common issues
Advanced configurations for security and performance
Best practices for production deployments
With this setup:
Your services survive SSH disconnections
They automatically restart after crashes
They start automatically after VM reboots
You have centralized, searchable logs
You can manage everything with standard systemd commands
This is the foundation of professional production deployments. Your Oracle Cloud instance now runs services the way they should be run—reliably, automatically, and with proper monitoring.
Set up monitoring: Configure alerts for service failures
Implement log aggregation: Consider tools like Loki or ELK stack
Add health checks: Implement endpoint monitoring
Configure backups: Automate regular backups of your application and data
Document your setup: Keep notes on your specific configuration
Remember: Systemd isn't just about keeping services running—it's about running them professionally, with proper logging, monitoring, and fault tolerance. Take the time to configure it correctly, and your future self will thank you when your services stay online through reboots, crashes, and unexpected issues.