

Build Your Own Private ChatGPT: Secure AI API on Oracle Free Tier with Ollama, Nginx & Cloudflare
Search for a command to run...
No comments yet. Be the first to comment.
Introduction Running applications on Oracle Cloud Infrastructure (OCI) requires more than just starting your server—you need a robust setup that ensures your services stay running, restart automatically after crashes, and survive system reboots. This...

Ever found yourself in one of these situations? "Can you check my website?" but your app is running on localhost:3000 Need to test webhooks from external services but they can't reach your local machine Want to show a client your work-in-progress ...
This article walks you through every single file required to get a secure, refresh-token-enabled JWT authentication system in NestJS with Prisma, bcrypt, Passport, and class-validator.Copy / paste the snippets in order and you will have a working pro...

Introduction to Amazon EC2 Compute refers to the processing power needed to run applications, manage data, and perform calculations. In the cloud, this power is available on-demand. You can access it remotely without owning or maintaining physical ha...
⚠️ Important Notice: This is not a beginner-friendly tutorial. This guide assumes you have practical, hands-on experience with Linux system administration, cloud infrastructure, and networking concepts. You'll need to be comfortable with:
Linux Command Line: Working with Ubuntu/Debian systems, managing services with systemd, and editing configuration files
Docker: Understanding containerization, port mapping, and container networking
Nginx: Basic knowledge of reverse proxy configuration and web server management
DNS & Networking: Understanding of subdomains, CNAME records, and how internet routing works
API Concepts: Familiarity with REST APIs, HTTP methods, and authentication mechanisms
Cloud Infrastructure: Experience with cloud providers (Oracle Cloud in this case) and their networking/security configurations
What You'll Build: By the end of this tutorial, you'll have a production-grade, secure AI API endpoint accessible via your custom domain, featuring:
A self-hosted large language model (deepseek-coder-v2) running on your own infrastructure
Bearer token authentication to protect your API from unauthorized access
Automatic HTTPS encryption via Cloudflare Tunnel (no SSL certificate management needed)
A clean web interface for interactive chat
Zero exposed ports on your server (everything routed through secure tunnels)
Time Investment: 30-45 minutes for the complete setup
Required Resources:
Oracle Cloud Free Tier account (or any cloud provider with 11GB+ RAM)
A registered domain name
Cloudflare account (free tier works perfectly)
Basic familiarity with Postman or curl for API testing
Before we jump into the technical implementation, let me address the obvious question: "Why go through all this trouble when I can just use ChatGPT's API?"
Complete Control & Privacy: Your data never leaves your server. No third-party can train on your prompts or access your sensitive information.
Cost Efficiency: After the initial setup, running costs are minimal (or free with Oracle's generous free tier). No per-token pricing, no usage limits.
Customization: Want to fine-tune the model for your specific use case? You own the entire stack.
Learning Experience: Understanding how modern AI infrastructure works is invaluable. This knowledge transfers to enterprise environments.
API Flexibility: Build your own applications, integrate into existing workflows, or share access with your team—all under your control.
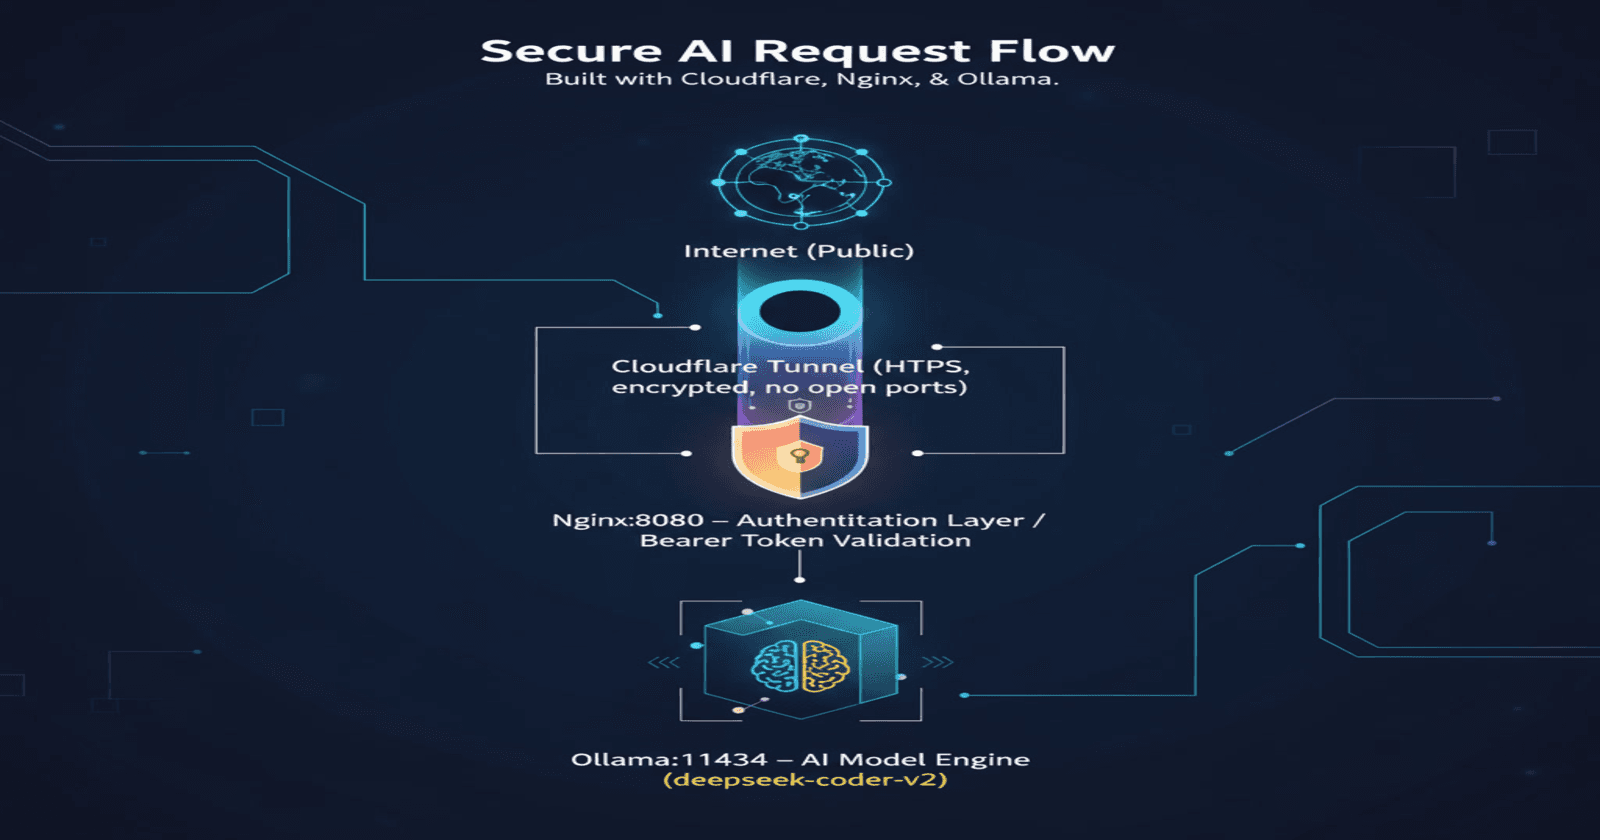
Before diving into the implementation, let's understand what we're building:
Internet (Public)
    ↓
Cloudflare Tunnel (HTTPS, encrypted, no open ports)
    ↓
Nginx:8080 (Authentication Layer - Bearer Token Validation)
    ↓
Ollama:11434 (AI Model Engine - deepseek-coder-v2)
The Flow:
Client sends HTTPS request with Bearer token to your domain
Cloudflare Tunnel routes the encrypted traffic to your server
Nginx validates the Bearer token
If valid, Nginx forwards the request to Ollama
Ollama processes the request using the AI model
Response travels back through the same secure path
Port Mapping:
Ollama: Port 11434 (localhost only, never exposed)
Nginx: Port 8080 (accessible only via Cloudflare Tunnel)
Open WebUI: Port 4000 (web interface for chat)
Ollama is a tool that allows you to run large language models locally. It's incredibly efficient and easy to use.
SSH into your Oracle Cloud Ubuntu instance and run:
bash
curl -fsSL https://ollama.com/install.sh | sh
Expected Output:
>>> Installing ollama to /usr/local
>>> Downloading Linux amd64 bundle
######################################################################## 100.0%
>>> Creating ollama user...
>>> Adding ollama user to render group...
>>> Adding ollama user to video group...
>>> Adding current user to ollama group...
>>> Creating ollama systemd service...
>>> Enabling and starting ollama service...
Created symlink /etc/systemd/system/default.target.wants/ollama.service
WARNING: Unable to detect NVIDIA/AMD GPU.
The GPU warning is normal if you're using a CPU-only instance.
bash
ollama --version
systemctl status ollama
Initially, you might be tempted to pull large models. Here's what happened in practice:
Mistake #1: Trying gpt-oss
bash
ollama pull gpt-oss
# Downloads 13GB successfully...

ollama run gpt-oss
# Error: model requires more system memory (13.1 GiB) than is available (10.2 GiB)
Lesson Learned: Always check your available memory first:
bash
free -h
Output on Oracle Free Tier ARM instance:
              total        used        free      shared  buff/cache   available
Mem:           11Gi       1.1Gi       8.6Gi       1.0Mi       1.9Gi        10Gi
Swap:            0B          0B          0B
With 11GB total RAM, you need models that fit comfortably in memory.
bash
# Remove the too-large model
ollama rm gpt-oss

# Pull deepseek-coder-v2 (8.9GB - perfect fit)
ollama pull deepseek-coder-v2
Why deepseek-coder-v2?
15.7B parameters (quantized to Q4_0)
Only 8.9GB in size
Excellent for coding tasks
Fits comfortably in 11GB RAM
Alternative models for your RAM:
bash
# If you want smaller/faster:
ollama pull llama3.2:3b      # 3B parameters, ~2.3GB
ollama pull phi3:mini         # 3B parameters, ~2.3GB
ollama pull gemma2:2b         # 2B parameters, ~1.6GB

# If you want more capable (but slower):
ollama pull llama3.1          # 8B parameters, ~4.7GB
ollama pull mistral           # 7B parameters, ~4.1GB
bash
ollama list
Output:
NAME                        ID              SIZE      MODIFIED
deepseek-coder-v2:latest    63fb193b3a9b    8.9 GB    5 minutes ago
bash
ollama run deepseek-coder-v2
You should see an interactive prompt. Try asking: "Write a Python function to calculate fibonacci numbers"
Type /bye to exit.
By default, Ollama only listens on 127.0.0.1 (localhost), which means Docker containers and external services can't reach it.
bash
sudo netstat -tlnp | grep 11434
Current Output (Problem):
tcp 0 0 127.0.0.1:11434 0.0.0.0:* LISTEN 36287/ollama
See the problem? It's only listening on 127.0.0.1.
Create a systemd override file:
bash
sudo mkdir -p /etc/systemd/system/ollama.service.d/
sudo tee /etc/systemd/system/ollama.service.d/override.conf > /dev/null << 'EOF'
[Service]
Environment="OLLAMA_HOST=0.0.0.0:11434"
EOF
bash
# Verify the file was created
cat /etc/systemd/system/ollama.service.d/override.conf

# Reload systemd and restart Ollama
sudo systemctl daemon-reload
sudo systemctl restart ollama

# Wait for Ollama to start
sleep 5
bash
sudo netstat -tlnp | grep 11434
Correct Output:
tcp6 0 0 :::11434 :::* LISTEN 37406/ollama
Perfect! Now it's listening on all interfaces (the :::11434 indicates IPv6 which includes IPv4).
bash
curl http://localhost:11434/api/tags
Expected Response:
json
{
  "models": [
    {
      "name": "deepseek-coder-v2:latest",
      "model": "deepseek-coder-v2:latest",
      "modified_at": "2025-11-16T22:41:09.74190977Z",
      "size": 8905126121,
      "digest": "63fb193b3a9b4322a18e8c6b250ca2e70a5ff531e962dbf95ba089b2566f2fa5",
      "details": {
        "parent_model": "",
        "format": "gguf",
        "family": "deepseek2",
        "families": ["deepseek2"],
        "parameter_size": "15.7B",
        "quantization_level": "Q4_0"
      }
    }
  ]
}
Open WebUI provides a beautiful ChatGPT-like interface for interacting with your models.
Why Docker? Docker containerizes Open WebUI with all its dependencies (Node.js, Python, databases) in one isolated package. This means: zero dependency conflicts, one-command installation, easy updates (docker pull and restart), automatic restarts on crashes, and simple rollback if something breaks. Without Docker, you'd manually install 10+ packages, manage version conflicts, and troubleshoot environment issues. Docker turns a 30-minute setup into a 30-second command.
bash
sudo apt update
sudo apt install -y docker.io
sudo systemctl start docker
sudo systemctl enable docker
sudo usermod -aG docker $USER
Important: Log out and log back in for the docker group changes to take effect.
bash
exit
# SSH back in
Critical Issue: Docker containers run in isolated networks and can't access the host's localhost by default.
Solution: Add a firewall rule to allow Docker's network to reach Ollama:
bash
# Allow Docker bridge network (172.17.0.0/16) to access Ollama
sudo iptables -I INPUT -s 172.17.0.0/16 -p tcp --dport 11434 -j ACCEPT

# Install iptables-persistent to save rules
sudo apt install -y iptables-persistent

# Save the rules
sudo netfilter-persistent save
bash
docker run -d \
  --name open-webui \
  -p 4000:8080 \
  -v open-webui:/app/backend/data \
  -e OLLAMA_BASE_URL=http://172.17.0.1:11434 \
  --restart always \
  ghcr.io/open-webui/open-webui:main
Configuration Explained:
-p 4000:8080: Maps container port 8080 to host port 4000
-v open-webui:/app/backend/data: Persists your chat history
-e OLLAMA_BASE_URL=http://172.17.0.1:11434: Docker's default bridge IP to reach the host
--restart always: Auto-restart on server reboot
bash
docker ps
Expected Output:
CONTAINER ID   IMAGE                                COMMAND           CREATED         STATUS                   PORTS
52fdefabd5f1   ghcr.io/open-webui/open-webui:main   "bash start.sh"   5 seconds ago   Up 5 seconds (healthy)   0.0.0.0:4000->8080/tcp
bash
# Test from inside the container
docker exec open-webui curl http://172.17.0.1:11434/api/tags
Expected Response:
json
{
  "models": [
    {
      "name": "deepseek-coder-v2:latest",
      ...
    }
  ]
}
If this fails, go back and verify:
Ollama is listening on 0.0.0.0:11434 (not just 127.0.0.1)
Firewall rule allows Docker network access
Docker container is using the correct bridge IP
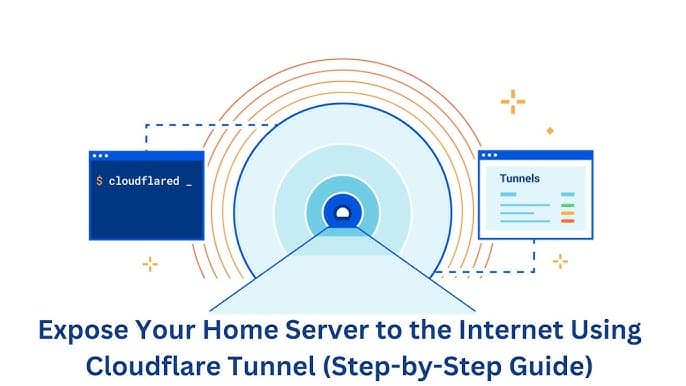
Cloudflare Tunnel creates a secure connection from your server to Cloudflare's edge network without exposing any ports.
bash
wget https://github.com/cloudflare/cloudflared/releases/latest/download/cloudflared-linux-amd64.deb
sudo dpkg -i cloudflared-linux-amd64.deb
bash
cloudflared tunnel login
This will output a URL. Open it in your browser, log in to Cloudflare, and select your domain for example (kumarchaudhary.com.np).
After authentication, a certificate is saved at ~/.cloudflared/cert.pem.
bash
cloudflared tunnel create my-oracle-tunnel
Output:
Tunnel credentials written to /home/ubuntu/.cloudflared/12345678-1234-1234-1234-12345678.json
Created tunnel my-oracle-tunnel with id d778463d-04a6-4641-a0d4-b375065351a9
Save your tunnel ID: 12345678-1234-1234-1234-12345678
bash
nano ~/.cloudflared/config.yml
Add this configuration (replace with your tunnel ID):
Replace tunnel id with yours.
tunnel: 12345678-1234-1234-1234-12345678
credentials-file: /home/ubuntu/.cloudflared/12345678-1234-1234-1234-12345678.json

ingress:
  - hostname: ai.kumarchaudhary.com.np
    service: http://localhost:4000
  - service: http_status:404
Configuration Explained:
tunnel: Your unique tunnel ID
credentials-file: Path to tunnel credentials
ingress: Routing rules (hostname → service)
Final catch-all rule returns 404 for unmatched requests
Route your subdomain through the tunnel:
bash
tunnel-id: 12345678-1234-1234-1234-12345678
cloudflared tunnel route dns 12345678-1234-1234-1234-12345678 ai.kumarchaudhary.com.np
Replace tunnel id with yours.
Alternative: Manually add a CNAME record in Cloudflare Dashboard:
Type: CNAME
Name: ai
Target: insert_your_tunnel id.cfargotunnel.com
Proxy status: Proxied (orange cloud)
bash
# Copy configuration to system directory
sudo mkdir -p /etc/cloudflared
sudo cp ~/.cloudflared/config.yml /etc/cloudflared/
sudo cp ~/.cloudflared/insert_your_tunnel_id.json /etc/cloudflared/

# Update config file to use system paths
sudo nano /etc/cloudflared/config.yml
Update the credentials-file path:
credentials-file: /etc/cloudflared/insert_your_tunnel_id.json
Install and start the service:
sudo cloudflared service install
sudo systemctl start cloudflared
sudo systemctl enable cloudflared
sudo systemctl status cloudflared
cloudflared tunnel info my-oracle-tunnel
Expected Output:
NAME:     my-oracle-tunnel
ID:       your_tunnel_id
CREATED:  2025-11-15 20:38:10.173885 +0000 UTC
CONNECTOR ID                         CREATED              ARCHITECTURE VERSION   ORIGIN IP      EDGE
cdccbf66-5703-4111-a3cc-bde3e95f54d2 2025-11-16T21:58:23Z linux_amd64  2025.11.1 132.145.32.154 1xlhr09, 2xlhr13
Open your browser and go to your subdomain in my case: https://ai.kumarchaudhary.com.np
First-time setup:
Create an account (first user becomes admin)
Click the model selector dropdown
Select deepseek-coder-v2:latest
Start chatting!
You can route multiple subdomains through the same tunnel.
bash
nano ~/.cloudflared/config.yml
Add more hostname routes:
yaml
tunnel: d778463d-04a6-4641-a0d4-b375065351a9
credentials-file: /home/ubuntu/.cloudflared/d778463d-04a6-4641-a0d4-b375065351a9.json

ingress:
  - hostname: orababy.kumarchaudhary.com.np
    service: http://localhost:3000
  - hostname: ai.kumarchaudhary.com.np
    service: http://localhost:4000
  - hostname: aiapi.kumarchaudhary.com.np
    service: http://localhost:8080
  - service: http_status:404
bash
cloudflared tunnel route dns d778463d-04a6-4641-a0d4-b375065351a9 orababy.kumarchaudhary.com.np
cloudflared tunnel route dns d778463d-04a6-4641-a0d4-b375065351a9 aiapi.kumarchaudhary.com.np
bash
sudo cp ~/.cloudflared/config.yml /etc/cloudflared/
sudo systemctl restart cloudflared
The Problem: Right now, anyone who knows your domain can access your API. We need to add authentication. This is the most important part what about our blog article is about how to use nginx for secure authentication.
The Solution: Use Nginx as a reverse proxy with Bearer token authentication.
bash
sudo apt update
sudo apt install -y nginx
bash
openssl rand -hex 32
Example Output:
a1b2c3d4e5f6g7h8i9j0k1l2m3n4o5p6q7r8s9t0u1v2w3x4y5z6
Save this token securely! This is your API key.
bash
sudo nano /etc/nginx/sites-available/ollama-api
Add this configuration (replace YOUR_TOKEN_HERE with your generated token):
nginx
server {
    listen 8080;
    server_name localhost;

    location / {
        # Check for Bearer token
        if ($http_authorization != "Bearer YOUR_TOKEN_HERE") {
            return 401 '{"error": "Unauthorized"}';
        }

        proxy_pass http://127.0.0.1:11434;
        proxy_http_version 1.1;
        proxy_set_header Host $host;
        proxy_set_header X-Real-IP $remote_addr;
        proxy_set_header X-Forwarded-For $proxy_add_x_forwarded_for;
        proxy_read_timeout 300s;
        proxy_connect_timeout 75s;
    }
}
Configuration Explained:
listen 8080: Nginx listens on port 8080
if ($http_authorization != "Bearer ..."): Validates Bearer token
return 401: Rejects unauthorized requests
proxy_pass http://127.0.0.1:11434: Forwards valid requests to Ollama
bash
sudo ln -s /etc/nginx/sites-available/ollama-api /etc/nginx/sites-enabled/
sudo nginx -t
sudo systemctl restart nginx
bash
sudo systemctl status nginx
sudo netstat -tlnp | grep 8080
Expected Output:
tcp 0 0 0.0.0.0:8080 0.0.0.0:* LISTEN 12345/nginx
Without token (should fail):
bash
curl http://localhost:8080/api/tags
Expected: {"error": "Unauthorized"}
With token (should work):
bash
curl http://localhost:8080/api/tags \
  -H "Authorization: Bearer YOUR_TOKEN_HERE"
Expected: Full JSON response with model list
Now route the API subdomain through Nginx (not directly to Ollama):
bash
nano ~/.cloudflared/config.yml
Update to:
yaml
tunnel: d778463d-04a6-4641-a0d4-b375065351a9
credentials-file: /home/ubuntu/.cloudflared/d778463d-04a6-4641-a0d4-b375065351a9.json

ingress:
  - hostname: orababy.kumarchaudhary.com.np
    service: http://localhost:3000
  - hostname: ai.kumarchaudhary.com.np
    service: http://localhost:4000
  - hostname: aiapi.kumarchaudhary.com.np
    service: http://localhost:8080
  - service: http_status:404
Key Change: aiapi.kumarchaudhary.com.np now points to port 8080 (Nginx), not 11434 (Ollama).
bash
sudo cp ~/.cloudflared/config.yml /etc/cloudflared/
sudo systemctl restart cloudflared
bash
curl https://aiapi.kumarchaudhary.com.np/api/chat -d '{
  "model": "deepseek-coder-v2",
  "messages": [{"role": "user", "content": "test"}],
  "stream": false
}'
Expected Response:
json
{"error": "Unauthorized"}

bash
curl https://aiapi.kumarchaudhary.com.np/api/chat \
  -H "Authorization: Bearer YOUR_TOKEN_HERE" \
  -H "Content-Type: application/json" \
  -d '{
    "model": "deepseek-coder-v2",
    "messages": [
      {
        "role": "user",
        "content": "Write a Python function to reverse a string"
      }
    ],
    "stream": false
  }'
Expected Response: You will get response don’t worry
json
{
  "model": "deepseek-coder-v2",
  "created_at": "2025-11-16T23:30:00Z",
  "message": {
    "role": "assistant",
    "content": "Here's a Python function to reverse a string:\n\n```python\ndef reverse_string(s):\n    return s[::-1]\n```"
  },
  "done": true
}
Setup in Postman:
Method: POST
URL: https://aiapi.kumarchaudhary.com.np/api/chat
Headers:
Content-Type: application/json
Authorization: Bearer YOUR_TOKEN_HERE
Body (raw JSON):
json
{
  "model": "deepseek-coder-v2",
  "messages": [
    {
      "role": "user",
      "content": "Explain how async/await works in JavaScript"
    }
  ],
  "stream": false
}
Let's recap what we've built and how it all works together:
1. Client (Postman/Browser)
   ↓ HTTPS Request + Bearer Token
   https://aiapi.kumarchaudhary.com.np/api/chat

2. Cloudflare Edge Network
   ↓ (DDoS protection, caching, SSL termination)
   Cloudflare Tunnel (encrypted connection)

3. Your Oracle Server - Cloudflared Service
   ↓ (routes to localhost:8080)

4. Nginx (Port 8080) - Authentication Layer
   ↓ Validates: Authorization: Bearer token
   ├─ ❌ Invalid/Missing token → 401 Unauthorized
   └─ ✅ Valid token → proxy_pass to Ollama

5. Ollama (Port 11434) - AI Engine
   ↓ (processes request with deepseek-coder-v2)
   Generates AI response

6. Response Path (Reverse)
   Ollama → Nginx → Cloudflared → Cloudflare → Client
Layer 1 - Cloudflare:
DDoS protection
SSL/TLS encryption
Rate limiting at edge
No server IP exposed
Layer 2 - Cloudflare Tunnel:
No open ports on server
Encrypted tunnel to Cloudflare
Only authorized tunnels can connect
Layer 3 - Nginx:
Bearer token authentication
Can add rate limiting per IP
Request validation
Access logs for monitoring
Layer 4 - Ollama:
Only accessible from localhost
No direct internet exposure
Isolated from external attacks
ServicePortAccessible FromPurposeOllama11434localhost + Docker bridgeAI model processingNginx8080Cloudflare Tunnel onlyAuthentication & reverse proxyOpen WebUI4000Cloudflare Tunnel onlyWeb chat interfaceCloudflared-Cloudflare edge onlySecure tunnel daemon
✅ Defense in Depth: Multiple security layers
✅ Zero Trust: Every request validated
✅ Encrypted End-to-End: HTTPS via Cloudflare
✅ No Exposed Ports: Everything via secure tunnel
✅ Scalable: Can add more models/services easily
✅ Monitorable: Nginx logs all requests
✅ Cost-Effective: Runs on free tier
✅ Private: Data never leaves your server
Endpoint: POST https://aiapi.kumarchaudhary.com.np/api/chat
Headers:
Content-Type: application/json
Authorization: Bearer YOUR_TOKEN_HERE
Request Body:
json
{
  "model": "deepseek-coder-v2",
  "messages": [
    {
      "role": "system",
      "content": "You are a helpful coding assistant."
    },
    {
      "role": "user",
      "content": "Write a REST API in Node.js"
    }
  ],
  "stream": false,
  "options": {
    "temperature": 0.7,
    "top_p": 0.9,
    "num_predict": 1000
  }
}
Endpoint: POST https://aiapi.kumarchaudhary.com.np/api/generate
Request Body:
json
{
  "model": "deepseek-coder-v2",
  "prompt": "Write a Python function to calculate factorial",
  "stream": false
}
Endpoint: GET https://aiapi.kumarchaudhary.com.np/api/tags
Headers:
Authorization: Bearer YOUR_TOKEN_HERE
Endpoint: POST https://aiapi.kumarchaudhary.com.np/api/show
Request Body:
json
{
  "name": "deepseek-coder-v2"
}
For different users or applications, create a key mapping file:
bash
sudo nano /etc/nginx/api-keys.conf
nginx
map $http_authorization $api_key_valid {
    default 0;
    "Bearer token_for_app1" 1;
    "Bearer token_for_app2" 1;
    "Bearer token_for_user1" 1;
}
Update Nginx config:
bash
sudo nano /etc/nginx/sites-available/ollama-api
nginx
server {
    listen 8080;
    server_name localhost;

    include /etc/nginx/api-keys.conf;

    location / {
        if ($api_key_valid = 0) {
            return 401 '{"error": "Unauthorized - Invalid or missing API key"}';
        }

        proxy_pass http://127.0.0.1:11434;
        proxy_http_version 1.1;
        proxy_set_header Host $host;
        proxy_set_header X-Real-IP $remote_addr;
        proxy_set_header X-Forwarded-For $proxy_add_x_forwarded_for;
        proxy_read_timeout 300s;
        proxy_connect_timeout 75s;
    }
}
Restart Nginx:
bash
sudo nginx -t
sudo systemctl restart nginx
Prevent API abuse by limiting requests:
bash
sudo nano /etc/nginx/nginx.conf
Add inside the http block:
nginx
http {
    # ... existing config ...

    # Define rate limit zone: 10 requests per minute per IP
    limit_req_zone $binary_remote_addr zone=ollama_limit:10m rate=10r/m;

    # ... rest of config ...
}
Update your site config:
bash
sudo nano /etc/nginx/sites-available/ollama-api
nginx
server {
    listen 8080;
    server_name localhost;

    location / {
        # Apply rate limiting
        limit_req zone=ollama_limit burst=5 nodelay;

        # Check authentication
        if ($http_authorization != "Bearer YOUR_TOKEN_HERE") {
            return 401 '{"error": "Unauthorized"}';
        }

        proxy_pass http://127.0.0.1:11434;
        proxy_http_version 1.1;
        proxy_set_header Host $host;
        proxy_set_header X-Real-IP $remote_addr;
        proxy_read_timeout 300s;
    }
}
Test and restart:
bash
sudo nginx -t
sudo systemctl restart nginx
Rate Limiting Explained:
rate=10r/m: 10 requests per minute per IP
burst=5: Allow brief bursts up to 5 requests
nodelay: Process burst requests immediately
Track all API requests for monitoring and debugging:
bash
sudo nano /etc/nginx/sites-available/ollama-api
Add logging configuration:
nginx
server {
    listen 8080;
    server_name localhost;

    # Custom log format with authentication info
    log_format api_access '$remote_addr - $remote_user [$time_local] '
                         '"$request" $status $body_bytes_sent '
                         '"$http_authorization" "$http_user_agent"';

    access_log /var/log/nginx/ollama-api-access.log api_access;
    error_log /var/log/nginx/ollama-api-error.log;

    location / {
        if ($http_authorization != "Bearer YOUR_TOKEN_HERE") {
            return 401 '{"error": "Unauthorized"}';
        }

        proxy_pass http://127.0.0.1:11434;
        proxy_http_version 1.1;
        proxy_set_header Host $host;
        proxy_set_header X-Real-IP $remote_addr;
        proxy_set_header X-Forwarded-For $proxy_add_x_forwarded_for;
        proxy_read_timeout 300s;
        proxy_connect_timeout 75s;
    }
}
View logs in real-time:
bash
# Watch access logs
sudo tail -f /var/log/nginx/ollama-api-access.log

# Watch error logs
sudo tail -f /var/log/nginx/ollama-api-error.log
If you're building a web app that calls your API:
bash
sudo nano /etc/nginx/sites-available/ollama-api
Add CORS headers:
nginx
server {
    listen 8080;
    server_name localhost;

    location / {
        # Check authentication
        if ($http_authorization != "Bearer YOUR_TOKEN_HERE") {
            return 401 '{"error": "Unauthorized"}';
        }

        # CORS headers
        add_header 'Access-Control-Allow-Origin' 'https://yourapp.com' always;
        add_header 'Access-Control-Allow-Methods' 'GET, POST, OPTIONS' always;
        add_header 'Access-Control-Allow-Headers' 'Authorization, Content-Type' always;
        add_header 'Access-Control-Max-Age' 1728000 always;

        # Handle preflight requests
        if ($request_method = 'OPTIONS') {
            return 204;
        }

        proxy_pass http://127.0.0.1:11434;
        proxy_http_version 1.1;
        proxy_set_header Host $host;
        proxy_set_header X-Real-IP $remote_addr;
        proxy_set_header X-Forwarded-For $proxy_add_x_forwarded_for;
        proxy_read_timeout 300s;
        proxy_connect_timeout 75s;
    }
}
Symptoms:
Open WebUI loads but no models in dropdown
"No models available" message
Diagnosis:
bash
# Check if Ollama is running
systemctl status ollama

# Check if Ollama has models
ollama list

# Test Ollama API directly
curl http://localhost:11434/api/tags

# Check if Docker can reach Ollama
docker exec open-webui curl http://172.17.0.1:11434/api/tags
Solutions:
bash
sudo netstat -tlnp | grep 11434
# Should show :::11434, not 127.0.0.1:11434

# If wrong, reconfigure:
cat /etc/systemd/system/ollama.service.d/override.conf
# Should contain: Environment="OLLAMA_HOST=0.0.0.0:11434"

sudo systemctl daemon-reload
sudo systemctl restart ollama
bash
# Add firewall rule
sudo iptables -I INPUT -s 172.17.0.0/16 -p tcp --dport 11434 -j ACCEPT
sudo netfilter-persistent save

# Test again
docker exec open-webui curl http://172.17.0.1:11434/api/tags
Go to Open WebUI → Settings → Connections
Ensure Ollama URL is: http://172.17.0.1:11434
Click refresh icon
Should show green checkmark
Symptoms:
Nginx returns 502 error
API requests timeout
Diagnosis:
bash
# Check if Ollama is responding
curl http://localhost:11434/api/tags

# Check Nginx error logs
sudo tail -50 /var/log/nginx/error.log

# Check if Nginx can reach Ollama
sudo nginx -t
Solutions:
bash
systemctl status ollama
sudo systemctl restart ollama
bash
sudo nginx -t
# Fix any errors shown
sudo systemctl restart nginx
bash
sudo nano /etc/nginx/sites-available/ollama-api
Increase timeout values:
nginx
proxy_read_timeout 600s;  # Increase from 300s to 600s
proxy_connect_timeout 120s;
bash
sudo systemctl restart nginx
Symptoms:
Authentication fails with correct Bearer token
All requests return 401
Diagnosis:
bash
# Test locally first
curl http://localhost:8080/api/tags \
  -H "Authorization: Bearer YOUR_TOKEN_HERE"

# Check Nginx config
sudo cat /etc/nginx/sites-available/ollama-api | grep Bearer
Solutions:
bash
# View exact token in config
sudo cat /etc/nginx/sites-available/ollama-api
Make sure:
No extra spaces before/after token
Token is exactly as generated
Format is: "Bearer YOUR_TOKEN_HERE" (with quotes)
Regenerate a simpler token:
bash
openssl rand -hex 32
Update Nginx config with new token and restart.
Symptoms:
Domain shows "Connection timeout"
Can't access https://ai.kumarchaudhary.com.np
Diagnosis:
bash
# Check tunnel status
sudo systemctl status cloudflared

# Check tunnel info
cloudflared tunnel info my-oracle-tunnel

# Check logs
sudo journalctl -u cloudflared -n 50
Solutions:
bash
sudo systemctl start cloudflared
sudo systemctl enable cloudflared
bash
# Add DNS record
cloudflared tunnel route dns TUNNEL_ID subdomain.domain.com

# Or check Cloudflare Dashboard → DNS
# Should have CNAME: subdomain → TUNNEL_ID.cfargotunnel.com
bash
# Check if system config exists
sudo cat /etc/cloudflared/config.yml

# If missing, copy from home directory
sudo cp ~/.cloudflared/config.yml /etc/cloudflared/
sudo systemctl restart cloudflared
bash
sudo nano /etc/cloudflared/config.yml
Verify ports match:
Open WebUI: port 4000
Nginx/API: port 8080
Symptoms:
Ollama crashes randomly
"Out of memory" errors in logs
System becomes unresponsive
Diagnosis:
bash
# Check memory usage
free -h

# Check which model is loaded
ollama list

# Check Ollama logs
sudo journalctl -u ollama -n 100
Solutions:
bash
# Remove large model
ollama rm deepseek-coder-v2

# Pull smaller model
ollama pull llama3.2:3b  # Only ~2.3GB
bash
# Create 4GB swap file
sudo fallocate -l 4G /swapfile
sudo chmod 600 /swapfile
sudo mkswap /swapfile
sudo swapon /swapfile

# Make permanent
echo '/swapfile none swap sw 0 0' | sudo tee -a /etc/fstab
bash
sudo systemctl edit ollama
Add:
ini
[Service]
Environment="OLLAMA_MAX_LOADED_MODELS=1"
Environment="OLLAMA_NUM_PARALLEL=1"
bash
sudo systemctl daemon-reload
sudo systemctl restart ollama
Symptoms:
API requests take 30+ seconds
Streaming responses are choppy
Diagnosis:
bash
# Check system load
top
htop

# Check if model is loaded
curl http://localhost:11434/api/tags

# Test response time
time curl http://localhost:11434/api/generate -d '{
  "model": "deepseek-coder-v2",
  "prompt": "Hello",
  "stream": false
}'
Solutions:
First request: 10-30 seconds (loading model into RAM)
Subsequent requests: 2-5 seconds (model cached)
This is normal behavior
Oracle ARM instances use CPU (no GPU)
Consider smaller, faster models:
llama3.2:3b - faster than deepseek-coder-v2
phi3:mini - optimized for speed
gemma2:2b - very fast
bash
sudo systemctl edit ollama
Limit parallel requests:
ini
[Service]
Environment="OLLAMA_NUM_PARALLEL=1"
Create a monitoring script:
bash
nano ~/check-ollama-health.sh
bash
#!/bin/bash

echo "=== Ollama Health Check ==="
echo "Date: $(date)"
echo ""

# Check Ollama service
echo "1. Ollama Service Status:"
systemctl is-active ollama && echo "✅ Running" || echo "❌ Stopped"
echo ""

# Check Ollama API
echo "2. Ollama API Status:"
curl -s http://localhost:11434/api/tags > /dev/null && echo "✅ Responding" || echo "❌ Not responding"
echo ""

# Check available models
echo "3. Available Models:"
ollama list
echo ""

# Check memory usage
echo "4. Memory Usage:"
free -h | grep Mem
echo ""

# Check disk space
echo "5. Disk Space:"
df -h / | tail -1
echo ""

# Check Nginx
echo "6. Nginx Status:"
systemctl is-active nginx && echo "✅ Running" || echo "❌ Stopped"
echo ""

# Check Cloudflare Tunnel
echo "7. Cloudflare Tunnel Status:"
systemctl is-active cloudflared && echo "✅ Running" || echo "❌ Stopped"
echo ""

# Check Open WebUI
echo "8. Open WebUI Status:"
docker ps | grep open-webui > /dev/null && echo "✅ Running" || echo "❌ Stopped"
echo ""

echo "=== End Health Check ==="
Make executable:
bash
chmod +x ~/check-ollama-health.sh
Run daily:
bash
crontab -e
Add:
0 9 * * * /home/ubuntu/check-ollama-health.sh >> /home/ubuntu/health-check.log 2>&1
Prevent logs from filling disk:
bash
sudo nano /etc/logrotate.d/ollama-api
/var/log/nginx/ollama-api-*.log {
    daily
    rotate 7
    compress
    delaycompress
    notifempty
    missingok
    sharedscripts
    postrotate
        [ -f /var/run/nginx.pid ] && kill -USR1 $(cat /var/run/nginx.pid)
    endscript
}
Create a backup script:
bash
nano ~/backup-ollama-config.sh
bash
#!/bin/bash

BACKUP_DIR="/home/ubuntu/ollama-backups"
DATE=$(date +%Y%m%d_%H%M%S)

mkdir -p $BACKUP_DIR

# Backup Ollama config
sudo cp /etc/systemd/system/ollama.service.d/override.conf $BACKUP_DIR/ollama-override-$DATE.conf

# Backup Nginx config
sudo cp /etc/nginx/sites-available/ollama-api $BACKUP_DIR/nginx-ollama-api-$DATE.conf

# Backup Cloudflare Tunnel config
sudo cp /etc/cloudflared/config.yml $BACKUP_DIR/cloudflared-config-$DATE.yml

# Backup Open WebUI data (Docker volume)
docker run --rm -v open-webui:/data -v $BACKUP_DIR:/backup alpine tar czf /backup/open-webui-data-$DATE.tar.gz -C /data .

echo "Backup completed: $DATE"
ls -lh $BACKUP_DIR/*$DATE*
Make executable:
bash
chmod +x ~/backup-ollama-config.sh
Run weekly:
bash
crontab -e
Add:
0 2 * * 0 /home/ubuntu/backup-ollama-config.sh
bash
sudo systemctl edit ollama
Add performance tuning:
ini
[Service]
Environment="OLLAMA_HOST=0.0.0.0:11434"
Environment="OLLAMA_MAX_LOADED_MODELS=1"
Environment="OLLAMA_NUM_PARALLEL=2"
Environment="OLLAMA_FLASH_ATTENTION=1"
Environment="OLLAMA_MAX_QUEUE=10"
Parameters Explained:
OLLAMA_MAX_LOADED_MODELS=1: Keep only 1 model in memory
OLLAMA_NUM_PARALLEL=2: Handle 2 requests simultaneously
OLLAMA_FLASH_ATTENTION=1: Use optimized attention mechanism
OLLAMA_MAX_QUEUE=10: Queue up to 10 requests
Restart:
bash
sudo systemctl daemon-reload
sudo systemctl restart ollama
bash
sudo nano /etc/nginx/nginx.conf
Optimize worker settings:
nginx
user www-data;
worker_processes auto;
worker_rlimit_nofile 65535;

events {
    worker_connections 4096;
    multi_accept on;
    use epoll;
}

http {
    # Keepalive
    keepalive_timeout 65;
    keepalive_requests 100;

    # Buffers
    client_body_buffer_size 128k;
    client_max_body_size 100m;
    client_header_buffer_size 1k;
    large_client_header_buffers 4 16k;

    # Timeouts
    send_timeout 300s;
    client_body_timeout 300s;
    client_header_timeout 300s;

    # Compression
    gzip on;
    gzip_vary on;
    gzip_proxied any;
    gzip_comp_level 6;
    gzip_types text/plain text/css application/json application/javascript text/xml application/xml application/xml+rss text/javascript;

    # Rest of your config...
}
Test and restart:
bash
sudo nginx -t
sudo systemctl restart nginx
Limit Open WebUI resource usage:
bash
docker stop open-webui
docker rm open-webui

docker run -d \
  --name open-webui \
  -p 4000:8080 \
  -v open-webui:/app/backend/data \
  -e OLLAMA_BASE_URL=http://172.17.0.1:11434 \
  --memory="2g" \
  --cpus="2.0" \
  --restart always \
  ghcr.io/open-webui/open-webui:main
Create a token rotation script:
bash
nano ~/rotate-api-token.sh
bash
#!/bin/bash

# Generate new token
NEW_TOKEN=$(openssl rand -hex 32)

echo "New API Token: $NEW_TOKEN"
echo ""
echo "Update the following locations:"
echo "1. /etc/nginx/sites-available/ollama-api"
echo "2. Your application configuration"
echo "3. Postman/API client settings"
echo ""
echo "Steps:"
echo "sudo nano /etc/nginx/sites-available/ollama-api"
echo "# Replace the Bearer token with: $NEW_TOKEN"
echo "sudo nginx -t"
echo "sudo systemctl restart nginx"
Make executable:
bash
chmod +x ~/rotate-api-token.sh
Run monthly and update token:
bash
./rotate-api-token.sh
Protect against brute force attacks:
bash
sudo apt install -y fail2ban
Create Nginx jail:
bash
sudo nano /etc/fail2ban/jail.local
ini
[nginx-auth]
enabled = true
filter = nginx-auth
logpath = /var/log/nginx/ollama-api-access.log
maxretry = 5
bantime = 3600
findtime = 600
Create filter:
bash
sudo nano /etc/fail2ban/filter.d/nginx-auth.conf
ini
[Definition]
failregex = ^<HOST> .* 401 .*$
ignoreregex =
Restart Fail2Ban:
bash
sudo systemctl restart fail2ban
sudo fail2ban-client status nginx-auth
bash
# Weekly security updates
sudo apt update
sudo apt upgrade -y

# Update Ollama
curl -fsSL https://ollama.com/install.sh | sh

# Update Cloudflared
wget https://github.com/cloudflare/cloudflared/releases/latest/download/cloudflared-linux-amd64.deb
sudo dpkg -i cloudflared-linux-amd64.deb
sudo systemctl restart cloudflared

# Update Docker images
docker pull ghcr.io/open-webui/open-webui:main
docker stop open-webui
docker rm open-webui
# Re-run docker run command with new image
bash
# Check who accessed your API
sudo grep "Bearer" /var/log/nginx/ollama-api-access.log | tail -20

# Check failed authentication attempts
sudo grep "401" /var/log/nginx/ollama-api-access.log | tail -20

# Check most active IPs
sudo awk '{print $1}' /var/log/nginx/ollama-api-access.log | sort | uniq -c | sort -rn | head -10
What you get (forever free):
4 ARM-based Ampere A1 cores (up to 24GB RAM total)
200GB block storage
10TB outbound data transfer per month
We're using: 4 cores, 11GB RAM, ~20GB storage
Monthly costs: $0.00 ✅
What you get:
Unlimited bandwidth through tunnel
DDoS protection
SSL certificates
CDN caching
Monthly costs: $0.00 ✅
Variable cost:
.com.np domains: Usually free or ~$10/year
Your domain: kumarchaudhary.com.np
Comparison with OpenAI API:
GPT-4 Turbo: $10/1M input tokens, $30/1M output tokens
Average conversation (~1000 tokens): $0.04
1000 conversations/month: $40/month
Your setup:
Unlimited conversations
Zero per-request cost
Full data privacy
javascript
// ollama-client.js
const OLLAMA_API_URL = 'https://aiapi.kumarchaudhary.com.np';
const API_TOKEN = process.env.OLLAMA_API_KEY;

async function chat(message) {
  const response = await fetch(`${OLLAMA_API_URL}/api/chat`, {
    method: 'POST',
    headers: {
      'Content-Type': 'application/json',
      'Authorization': `Bearer ${API_TOKEN}`
    },
    body: JSON.stringify({
      model: 'deepseek-coder-v2',
      messages: [
        { role: 'user', content: message }
      ],
      stream: false
    })
  });

  const data = await response.json();
  return data.message.content;
}

// Usage
chat('Explain async/await in JavaScript')
  .then(response => console.log(response))
  .catch(error => console.error('Error:', error));
python
# ollama_client.py
import os
import requests

OLLAMA_API_URL = 'https://aiapi.kumarchaudhary.com.np'
API_TOKEN = os.getenv('OLLAMA_API_KEY')

def chat(message, system_prompt=None):
    messages = []

    if system_prompt:
        messages.append({'role': 'system', 'content': system_prompt})

    messages.append({'role': 'user', 'content': message})

    response = requests.post(
        f'{OLLAMA_API_URL}/api/chat',
        headers={
            'Content-Type': 'application/json',
            'Authorization': f'Bearer {API_TOKEN}'
        },
        json={
            'model': 'deepseek-coder-v2',
            'messages': messages,
            'stream': False
        }
    )

    response.raise_for_status()
    return response.json()['message']['content']

# Usage
if __name__ == '__main__':
    result = chat(
        'Write a Python function to find prime numbers',
        system_prompt='You are an expert Python developer'
    )
    print(result)
bash
#!/bin/bash
# ask-ai.sh

OLLAMA_API_URL="https://aiapi.kumarchaudhary.com.np"
API_TOKEN="YOUR_TOKEN_HERE"

ask_ai() {
    local question="$1"

    curl -s "$OLLAMA_API_URL/api/chat" \
      -H "Authorization: Bearer $API_TOKEN" \
      -H "Content-Type: application/json" \
      -d "{
        \"model\": \"deepseek-coder-v2\",
        \"messages\": [{\"role\": \"user\", \"content\": \"$question\"}],
        \"stream\": false
      }" | jq -r '.message.content'
}

# Usage
ask_ai "Explain what the ls command does in Linux"
Make executable:
bash
chmod +x ask-ai.sh
./ask-ai.sh
javascript
// slack-ollama-bot.js
const { App } = require('@slack/bolt');

const app = new App({
  token: process.env.SLACK_BOT_TOKEN,
  signingSecret: process.env.SLACK_SIGNING_SECRET
});

async function askOllama(question) {
  const response = await fetch('https://aiapi.kumarchaudhary.com.np/api/chat', {
    method: 'POST',
    headers: {
      'Content-Type': 'application/json',
      'Authorization': `Bearer ${process.env.OLLAMA_API_KEY}`
    },
    body: JSON.stringify({
      model: 'deepseek-coder-v2',
      messages: [{ role: 'user', content: question }],
      stream: false
    })
  });

  const data = await response.json();
  return data.message.content;
}

app.message(/ask:(.*)/, async ({ message, say }) => {
  const question = message.text.replace(/ask:\s*/, '');
  const answer = await askOllama(question);
  await say(answer);
});

(async () => {
  await app.start(process.env.PORT || 3000);
  console.log('⚡️ Slack bot is running!');
})();
python
# discord_ollama_bot.py
import discord
import os
import requests

intents = discord.Intents.default()
intents.message_content = True
client = discord.Client(intents=intents)

OLLAMA_API_URL = 'https://aiapi.kumarchaudhary.com.np'
API_TOKEN = os.getenv('OLLAMA_API_KEY')

def ask_ollama(question):
    response = requests.post(
        f'{OLLAMA_API_URL}/api/chat',
        headers={
            'Authorization': f'Bearer {API_TOKEN}',
            'Content-Type': 'application/json'
        },
        json={
            'model': 'deepseek-coder-v2',
            'messages': [{'role': 'user', 'content': question}],
            'stream': False
        }
    )
    return response.json()['message']['content']

@client.event
async def on_message(message):
    if message.author == client.user:
        return

    if message.content.startswith('!ask'):
        question = message.content[5:].strip()
        answer = ask_ollama(question)
        await message.channel.send(answer)

client.run(os.getenv('DISCORD_TOKEN'))
You can run multiple models simultaneously (memory permitting):
bash
# Pull additional models
ollama pull codellama        # For coding tasks
ollama pull mistral          # For general tasks
ollama pull llama3.1         # For reasoning

# Check total size
ollama list
Memory calculation:
Current: deepseek-coder-v2 (8.9GB)
Available: ~10GB
You can add one more small model (~2-3GB)
Model switching in API:
json
{
  "model": "codellama",
  "messages": [...]
}
For production workloads, you might need multiple servers:
Architecture:
Cloudflare Load Balancer
    ↓
Multiple Oracle Instances (each running Ollama)
    ↓
Shared PostgreSQL for user data
Load balancing with Cloudflare:
Create multiple tunnels (one per server)
Use Cloudflare Load Balancer to distribute traffic
Each tunnel points to a different Oracle instance
Upgrade to Oracle Cloud paid tier:
8 cores, 48GB RAM: ~$50/month
Run multiple large models simultaneously
Faster response times with more parallel requests
bash
ollama pull codellama          # 7B, specialized for code
ollama pull deepseek-coder     # Alternative to deepseek-coder-v2
ollama pull starcoder2         # 3B-7B, fast coding model
bash
ollama pull llama3.1           # 8B, excellent all-rounder
ollama pull mistral            # 7B, fast and capable
ollama pull phi3               # 3B, Microsoft's efficient model
bash
ollama pull nous-hermes2       # Instruction following
ollama pull neural-chat        # Conversational AI
ollama pull orca-mini          # Reasoning tasks
ModelSizeRAM NeededBest ForSpeedgemma2:2b1.6GB3GBQuick answers⚡⚡⚡⚡⚡phi3:mini2.3GB4GBEfficiency⚡⚡⚡⚡llama3.2:3b2.3GB4GBBalanced⚡⚡⚡⚡mistral4.1GB6GBGeneral use⚡⚡⚡codellama3.8GB6GBCoding⚡⚡⚡llama3.14.7GB7GBReasoning⚡⚡deepseek-coder-v28.9GB11GBAdvanced coding⚡⚡
A: Yes, with considerations:
✅ Good for: Internal tools, personal projects, small teams
⚠️ Consider for production:
Add monitoring (Prometheus, Grafana)
Set up automated backups
Implement proper logging
Add alerting for downtime
Consider multiple servers for redundancy
bash
curl -fsSL https://ollama.com/install.sh | sh
sudo systemctl restart ollama
Models stay intact during updates.
A: Yes! Ollama supports fine-tuning:
bash
# Create a Modelfile
nano Modelfile
FROM deepseek-coder-v2
PARAMETER temperature 0.8
SYSTEM You are an expert Python developer specializing in Django.
bash
ollama create my-django-expert -f Modelfile
ollama run my-django-expert
A: Complete privacy:
All data stays on your server
No external API calls
No telemetry to Ollama/anyone
You control everything
A: Oracle Free Tier doesn't include GPUs, but you can:
Use Oracle paid tier with GPU ($1-3/hour)
Use other providers (AWS, GCP, Azure) with GPU
CPU-only is fine for most use cases
A: Oracle Free Tier includes 200GB:
bash
# Check current usage
df -h

# If needed, add Oracle block storage:
# - Go to Oracle Cloud Console
# - Create Block Volume (up to 200GB free)
# - Attach to instance
# - Mount and use
A: Yes, several ways:
Sell API access to clients
Build SaaS products on top
Offer consulting for similar setups
Create niche AI applications
Legal considerations:
Check Ollama's license (Apache 2.0 - commercial use allowed)
Check individual model licenses
Comply with your local laws
A: Backup and portability:
bash
# Backup everything
./backup-ollama-config.sh

# Export Docker volumes
docker run --rm -v open-webui:/data -v $(pwd):/backup alpine tar czf /backup/open-webui-backup.tar.gz -C /data .

# Export models
ollama list  # Note which models you have
# Re-pull them on new server
Migration is straightforward - same setup works on any Ubuntu server.
For high availability, run multiple Ollama instances:
Setup on ports 11434, 11435, 11436:
bash
# Create separate systemd services for each instance
sudo cp /etc/systemd/system/ollama.service /etc/systemd/system/ollama-2.service
sudo cp /etc/systemd/system/ollama.service /etc/systemd/system/ollama-3.service

# Edit each service file
sudo nano /etc/systemd/system/ollama-2.service
# Change: Environment="OLLAMA_HOST=0.0.0.0:11435"

sudo nano /etc/systemd/system/ollama-3.service
# Change: Environment="OLLAMA_HOST=0.0.0.0:11436"

# Start all instances
sudo systemctl start ollama-2
sudo systemctl start ollama-3
sudo systemctl enable ollama-2
sudo systemctl enable ollama-3
Load balance with Nginx:
nginx
upstream ollama_backend {
    least_conn;
    server 127.0.0.1:11434;
    server 127.0.0.1:11435;
    server 127.0.0.1:11436;
}

server {
    listen 8080;
    location / {
        if ($http_authorization != "Bearer YOUR_TOKEN") {
            return 401;
        }
        proxy_pass http://ollama_backend;
    }
}
Reduce redundant API calls with caching:
nginx
# Add to nginx.conf http block
proxy_cache_path /var/cache/nginx/ollama levels=1:2 keys_zone=ollama_cache:10m max_size=1g inactive=60m;

# In your server block
location /api/generate {
    proxy_cache ollama_cache;
    proxy_cache_valid 200 10m;
    proxy_cache_key "$request_body";

    # Rest of proxy config...
}
Enable real-time streaming responses:
nginx
location / {
    proxy_pass http://127.0.0.1:11434;
    proxy_http_version 1.1;
    proxy_set_header Upgrade $http_upgrade;
    proxy_set_header Connection "upgrade";
    proxy_set_header Host $host;
    proxy_read_timeout 86400;
}
Host your own model repository:
bash
# Create model storage
mkdir -p /opt/ollama-models

# Set Ollama to use custom path
sudo systemctl edit ollama
ini
[Service]
Environment="OLLAMA_MODELS=/opt/ollama-models"
bash
sudo systemctl daemon-reload
sudo systemctl restart ollama
FeatureYour SetupChatGPT APICostFree (after setup)$0.03-0.12 per 1K tokensPrivacy100% privateData sent to OpenAICustomizationFull controlLimitedLatencyMedium (no GPU)FastSetup complexityHighLowScalabilityLimited by hardwareUnlimited
FeatureYour SetupClaude APICostFree$0.80-24 per 1M tokensContext windowModel dependentUp to 200K tokensPrivacyCompleteData sent to AnthropicSpeedMediumFastQualityModel dependentVery high
FeatureOracle Free Tier + CPUGPU ServerCost$0/month$100-500/monthSpeedMedium (3-5s/response)Fast (0.5-1s/response)Setup complexityMediumHighScalabilityLimitedHighModel sizeUp to 8B parameters70B+ parameters
You've now built a complete, production-ready AI API infrastructure that:
✅ Costs nothing (using free tiers)
✅ Is fully secure (multi-layer authentication, encryption)
✅ Respects privacy (all data stays on your server)
✅ Scales reasonably (handles moderate traffic)
✅ Is maintainable (clear architecture, logging, monitoring)
✅ Is flexible (swap models, add features easily)
Infrastructure as Code: Setting up services with configuration files
Networking: Understanding tunnels, proxies, and routing
Security: Implementing defense-in-depth with multiple layers
Containerization: Using Docker for isolated services
API Design: Creating and securing RESTful endpoints
System Administration: Managing Linux services and resources
Immediate:
Test your API thoroughly with various prompts
Set up monitoring and alerting
Create backups
Document your API for your team
Short-term: 5. Build an application using your API 6. Experiment with different models 7. Optimize performance based on usage patterns 8. Add rate limiting per user/API key
Long-term: 9. Consider adding more servers for redundancy 10. Implement advanced caching strategies 11. Build custom fine-tuned models 12. Create a developer portal for your API
Ollama Documentation: https://github.com/ollama/ollama
Open WebUI: https://github.com/open-webui/open-webui
Cloudflare Tunnel Docs: https://developers.cloudflare.com/cloudflare-one/connections/connect-apps/
Nginx Documentation: https://nginx.org/en/docs/
Model Library: https://ollama.com/library
Join these communities for help:
Ollama Discord: https://discord.gg/ollama
r/selfhosted on Reddit
r/LocalLLaMA on Reddit
Building your own AI infrastructure is more than just following steps—it's about understanding how modern cloud-native applications work. The skills you've gained here transfer directly to enterprise environments where these same patterns are used at scale.
Key Takeaways:
Separation of Concerns: Each component (Ollama, Nginx, Cloudflare) does one thing well
Security by Design: Authentication and encryption at every layer
Observability Matters: Logging and monitoring are not optional
Automation is Key: Scripts and systemd services make everything reproducible
Cost Optimization: Free tiers can run serious workloads
Remember: The most secure system is one you understand completely. You now own every layer of your AI stack, from the network tunnel to the model weights. That's powerful.
File: /etc/systemd/system/ollama.service.d/override.conf
ini
[Service]
Environment="OLLAMA_HOST=0.0.0.0:11434"
Environment="OLLAMA_MAX_LOADED_MODELS=1"
Environment="OLLAMA_NUM_PARALLEL=2"
File: /etc/nginx/sites-available/ollama-api
nginx
server {
    listen 8080;
    server_name localhost;

    # Logging
    log_format api_access '$remote_addr - $remote_user [$time_local] '
                         '"$request" $status $body_bytes_sent '
                         '"$http_authorization" "$http_user_agent"';
    access_log /var/log/nginx/ollama-api-access.log api_access;
    error_log /var/log/nginx/ollama-api-error.log;

    location / {
        # Authentication
        if ($http_authorization != "Bearer YOUR_TOKEN_HERE") {
            return 401 '{"error": "Unauthorized"}';
        }

        # Proxy to Ollama
        proxy_pass http://127.0.0.1:11434;
        proxy_http_version 1.1;
        proxy_set_header Host $host;
        proxy_set_header X-Real-IP $remote_addr;
        proxy_set_header X-Forwarded-For $proxy_add_x_forwarded_for;
        proxy_read_timeout 300s;
        proxy_connect_timeout 75s;
    }
}
File: /etc/cloudflared/config.yml
yaml
tunnel: YOUR_TUNNEL_ID
credentials-file: /etc/cloudflared/YOUR_TUNNEL_ID.json

ingress:
  - hostname: ai.yourdomain.com
    service: http://localhost:4000
  - hostname: aiapi.yourdomain.com
    service: http://localhost:8080
  - service: http_status:404
File: docker-compose.yml
yaml
version: '3.8'

services:
  open-webui:
    image: ghcr.io/open-webui/open-webui:main
    container_name: open-webui
    ports:
      - "4000:8080"
    volumes:
      - open-webui:/app/backend/data
    environment:
      - OLLAMA_BASE_URL=http://172.17.0.1:11434
    restart: always
    deploy:
      resources:
        limits:
          memory: 2G
          cpus: '2.0'

volumes:
  open-webui:
bash
# List models
ollama list

# Pull a model
ollama pull model-name

# Remove a model
ollama rm model-name

# Run interactive chat
ollama run model-name

# Show model info
ollama show model-name

# Check Ollama version
ollama --version
bash
# Ollama
sudo systemctl status ollama
sudo systemctl restart ollama
sudo systemctl stop ollama
sudo journalctl -u ollama -f

# Nginx
sudo systemctl status nginx
sudo systemctl restart nginx
sudo nginx -t
sudo tail -f /var/log/nginx/ollama-api-access.log

# Cloudflare Tunnel
sudo systemctl status cloudflared
sudo systemctl restart cloudflared
sudo journalctl -u cloudflared -f
cloudflared tunnel info my-oracle-tunnel
bash
# List containers
docker ps
docker ps -a

# View logs
docker logs open-webui
docker logs -f open-webui

# Restart container
docker restart open-webui

# Stop and remove
docker stop open-webui
docker rm open-webui

# Execute command in container
docker exec open-webui curl http://172.17.0.1:11434/api/tags
bash
# Memory usage
free -h

# Disk usage
df -h

# CPU usage
top
htop

# Network connections
sudo netstat -tlnp
sudo ss -tlnp

# Process list
ps aux | grep ollama
ps aux | grep nginx
bash
# List models
curl http://localhost:11434/api/tags

# Generate completion
curl http://localhost:11434/api/generate -d '{
  "model": "deepseek-coder-v2",
  "prompt": "Hello",
  "stream": false
}'

# Chat
curl http://localhost:11434/api/chat -d '{
  "model": "deepseek-coder-v2",
  "messages": [{"role": "user", "content": "Hi"}],
  "stream": false
}'

# With authentication
curl https://aiapi.yourdomain.com/api/chat \
  -H "Authorization: Bearer YOUR_TOKEN" \
  -H "Content-Type: application/json" \
  -d '{"model": "deepseek-coder-v2", "messages": [{"role": "user", "content": "test"}]}'
API not responding?
├─ Cloudflare Tunnel issue?
│  ├─ Check: sudo systemctl status cloudflared
│  ├─ Check: cloudflared tunnel info my-oracle-tunnel
│  └─ Fix: sudo systemctl restart cloudflared
│
├─ Nginx issue?
│  ├─ Check: sudo systemctl status nginx
│  ├─ Check: sudo nginx -t
│  ├─ Check: sudo tail -50 /var/log/nginx/error.log
│  └─ Fix: sudo systemctl restart nginx
│
├─ Ollama issue?
│  ├─ Check: systemctl status ollama
│  ├─ Check: curl http://localhost:11434/api/tags
│  ├─ Check: sudo journalctl -u ollama -n 100
│  └─ Fix: sudo systemctl restart ollama
│
└─ Network/Firewall issue?
   ├─ Check: sudo iptables -L -n
   ├─ Check: docker exec open-webui curl http://172.17.0.1:11434/api/tags
   └─ Fix: sudo iptables -I INPUT -s 172.17.0.0/16 -p tcp --dport 11434 -j ACCEPT
Thank you for following this guide! If you found it helpful, consider:
Sharing it with others building similar systems
Contributing improvements via GitHub
Joining the community discussions
Happy building! 🚀
Last updated: November 2025
Author: Kumar Chaudhary
License: MIT