

From Localhost to Global: Expose Your Development Server to the Internet with Cloudflare Tunnel
Search for a command to run...
No comments yet. Be the first to comment.
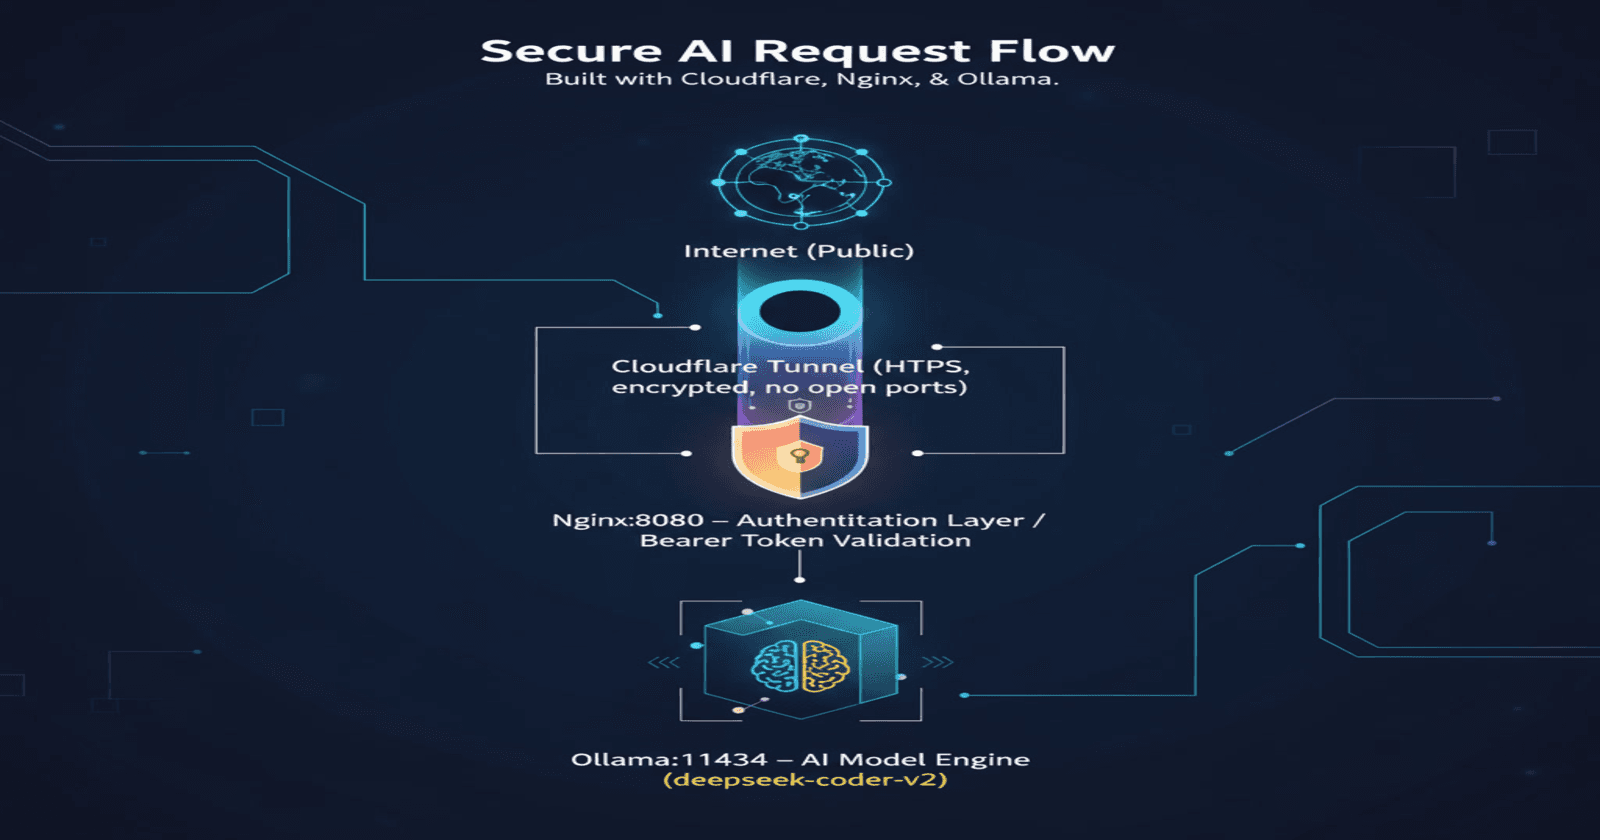
Let’s build a Secure Personal AI API with Ollama, Nginx, and Cloudflare Tunnel using oracle ubuntu instance Prerequisites and Target Audience ⚠️ Important Notice: This is not a beginner-friendly tutorial. This guide assumes you have practical, hands-...
Introduction Running applications on Oracle Cloud Infrastructure (OCI) requires more than just starting your server—you need a robust setup that ensures your services stay running, restart automatically after crashes, and survive system reboots. This...

This article walks you through every single file required to get a secure, refresh-token-enabled JWT authentication system in NestJS with Prisma, bcrypt, Passport, and class-validator.Copy / paste the snippets in order and you will have a working pro...

Introduction to Amazon EC2 Compute refers to the processing power needed to run applications, manage data, and perform calculations. In the cloud, this power is available on-demand. You can access it remotely without owning or maintaining physical ha...
Ever found yourself in one of these situations?
"Can you check my website?" but your app is running on localhost:3000
Need to test webhooks from external services but they can't reach your local machine
Want to show a client your work-in-progress without deploying to production
Working with a team and need to share your local development environment
Traditional solutions like ngrok work, but they're limited, expensive for permanent use, and give you random URLs that change every time. What if I told you there's a free, permanent solution that gives you a professional domain and enterprise-grade security?
Meet Cloudflare Tunnel – your gateway to making any localhost application accessible from anywhere in the world, with a custom domain, HTTPS, and zero configuration headaches.
Cloudflare Tunnel creates a secure, outbound-only connection from your machine to Cloudflare's global network. Instead of opening ports on your router or dealing with dynamic IPs, the tunnel connects from inside your network to Cloudflare, which then serves your application to the world.
Think of it as a secure bridge between your localhost and the internet, with Cloudflare handling all the networking complexity.
| Feature | Cloudflare Tunnel | ngrok (Free) | Port Forwarding |
| Custom Domain | ✅ Your domain | ❌ Random URLs | ✅ Your domain |
| Permanent URLs | ✅ Never changes | ❌ Changes each restart | ✅ Static |
| HTTPS/SSL | ✅ Automatic | ✅ Basic | ⚠️ Manual setup |
| No Router Config | ✅ Works anywhere | ✅ Works anywhere | ❌ Complex setup |
| Multiple Services | ✅ Unlimited | ❌ 1 tunnel (free) | ✅ Multiple ports |
| Cost | ✅ Free | ✅ Free (limited) | ✅ Free |
| DDoS Protection | ✅ Enterprise grade | ❌ Basic | ❌ None |
| Bandwidth | ✅ Unlimited | ⚠️ Limited | ✅ Unlimited |
Before we begin, you'll need:
A domain name (can be purchased from Namecheap, Google Domains, etc.)
A free Cloudflare account
Your development application running locally
Basic command-line knowledge
Note: You can use any subdomain of your existing domain – no need to buy a separate one!
Sign up for a free Cloudflare account at cloudflare.com
Add your domain:
Click "Add Site" in the dashboard
Enter your domain name (e.g., mydomain.com)
Choose the Free plan
Update nameservers:
Cloudflare will provide you with nameservers
Go to your domain registrar (where you bought the domain)
Replace the existing nameservers with Cloudflare's
Wait for propagation (5 minutes to 24 hours)
Once your domain is active in Cloudflare, you'll see a green checkmark and can proceed to the next step.
# Using Homebrew
brew install cloudflared

# Or download directly
curl -fsSL https://github.com/cloudflare/cloudflared/releases/latest/download/cloudflared-darwin-amd64.tgz -o cloudflared.tgz
tar -xzf cloudflared.tgz
sudo mv cloudflared /usr/local/bin/
# Download the .deb package
curl -fsSL https://github.com/cloudflare/cloudflared/releases/latest/download/cloudflared-linux-amd64.deb -o cloudflared.deb

# Install
sudo dpkg -i cloudflared.deb
Download cloudflared-windows-amd64.exe from the GitHub releases page
Rename it to cloudflared.exe
Move it to a directory in your PATH, or run from the download location
cloudflared --version
You should see output like: cloudflared version 2025.8.1
Run the authentication command:
cloudflared tunnel login
This will:
Open a browser window
Prompt you to log into Cloudflare
Ask you to select your domain
Save authentication credentials to your machine
Success message: You'll see "You have successfully logged in" and credentials will be saved to ~/.cloudflared/cert.pem (macOS/Linux) or %USERPROFILE%\.cloudflared\cert.pem (Windows).
cloudflared tunnel create my-dev-tunnel
Output example:
Tunnel credentials written to /Users/yourname/.cloudflared/12345678-abcd-1234-efgh-123456789012.json
Created tunnel my-dev-tunnel with id 12345678-abcd-1234-efgh-123456789012
Important: Save that tunnel ID! You'll need it for configuration.
Create a configuration file at ~/.cloudflared/config.yml (macOS/Linux) or %USERPROFILE%\.cloudflared\config.yml (Windows):
tunnel: 12345678-abcd-1234-efgh-123456789012
credentials-file: /Users/yourname/.cloudflared/12345678-abcd-1234-efgh-123456789012.json

ingress:
  - hostname: dev.yourdomain.com
    service: http://localhost:3000
  - service: http_status:404
Configuration explained:
tunnel: Your tunnel ID from the previous step
credentials-file: Path to the JSON file created
hostname: The subdomain you want to use
service: Your local application URL
The final service: http_status:404 catches all other requests
Link your subdomain to the tunnel:
cloudflared tunnel route dns my-dev-tunnel dev.yourdomain.com
This automatically creates a CNAME record in your Cloudflare DNS pointing dev.yourdomain.com to your tunnel.
Make sure your development server is running. Here are common examples:
Here you need to create your own service. As i’m providing only command to start the services of different web services during local development mode.
npm start
# Usually runs on http://localhost:3000
npm run dev
# Usually runs on http://localhost:3000
node server.js
# Check your app's documentation for the port
flask run
# Usually runs on http://localhost:5000
python manage.py runserver
# Usually runs on http://localhost:8000
Start your tunnel:
cloudflared tunnel run my-dev-tunnel
Success! Your localhost application is now accessible at https://dev.yourdomain.com 🎉
Outbound Connection: Your machine connects to Cloudflare (no inbound ports needed)
DNS Resolution: dev.yourdomain.com resolves to Cloudflare's servers
Traffic Routing: Cloudflare routes requests through the tunnel to your localhost
SSL Termination: Cloudflare handles HTTPS automatically
Response: Your local app responds, and Cloudflare serves it globally
You can expose multiple localhost services with one tunnel:
tunnel: 12345678-abcd-1234-efgh-123456789012
credentials-file: /Users/yourname/.cloudflared/12345678-abcd-1234-efgh-123456789012.json

ingress:
  - hostname: api.yourdomain.com
    service: http://localhost:3001
  - hostname: frontend.yourdomain.com
    service: http://localhost:3000
  - hostname: admin.yourdomain.com
    service: http://localhost:4000
  - service: http_status:404
Route different paths to different local services:
tunnel: 12345678-abcd-1234-efgh-123456789012
credentials-file: /Users/yourname/.cloudflared/12345678-abcd-1234-efgh-123456789012.json

ingress:
  - hostname: dev.yourdomain.com
    path: /api/*
    service: http://localhost:3001
  - hostname: dev.yourdomain.com
    path: /admin/*
    service: http://localhost:4000
  - hostname: dev.yourdomain.com
    service: http://localhost:3000
  - service: http_status:404
Add custom headers for debugging or authentication:
tunnel: 12345678-abcd-1234-efgh-123456789012
credentials-file: /Users/yourname/.cloudflared/12345678-abcd-1234-efgh-123456789012.json

ingress:
  - hostname: dev.yourdomain.com
    service: http://localhost:3000
    originRequest:
      httpHeaderHost: dev.yourdomain.com
      httpHeaderFields:
        X-Forwarded-For: $CF_CONNECTING_IP
        X-Original-URL: $CF_RAY
  - service: http_status:404
Install as a system service:
sudo cloudflared service install
sudo systemctl enable cloudflared
sudo systemctl start cloudflared
Install as a Windows service:
cloudflared service install
Auto-start: Tunnel starts automatically when your computer boots
Background operation: Runs without keeping a terminal window open
Reliability: Automatically restarts if it crashes
System integration: Managed like other system services
Scenario: You're a freelance developer showing work to a client.
# config.yml for client demo
tunnel: your-tunnel-id
credentials-file: /path/to/credentials.json

ingress:
  - hostname: client-demo.yourdomain.com
    service: http://localhost:3000
  - service: http_status:404
Benefits:
Professional domain instead of localhost:3000
Client can access from anywhere
HTTPS by default (builds trust)
No need to deploy unfinished work
Scenario: Testing Stripe webhooks, GitHub webhooks, or any external service that needs to reach your local app.
# config.yml for webhook testing
tunnel: your-tunnel-id
credentials-file: /path/to/credentials.json

ingress:
  - hostname: webhooks.yourdomain.com
    service: http://localhost:4000
  - service: http_status:404
Usage:
# Your webhook endpoint becomes:
# https://webhooks.yourdomain.com/stripe-webhook
# Instead of: http://localhost:4000/stripe-webhook
Scenario: Multiple developers need to test the same backend API or frontend.
# config.yml for team development
tunnel: your-tunnel-id
credentials-file: /path/to/credentials.json

ingress:
  - hostname: team-api.yourdomain.com
    service: http://localhost:8080
  - hostname: team-frontend.yourdomain.com
    service: http://localhost:3000
  - service: http_status:404
Scenario: Testing your API with a mobile app that can't access localhost.
# config.yml for mobile testing
tunnel: your-tunnel-id
credentials-file: /path/to/credentials.json

ingress:
  - hostname: mobile-api.yourdomain.com
    service: http://localhost:5000
  - service: http_status:404
✅ Pros:
No inbound ports opened on your router
Outbound-only connections (more secure)
Cloudflare's DDoS protection
Automatic HTTPS/TLS encryption
⚠️ Considerations:
Your development app is now public (add authentication if needed)
Environment variables and secrets should be properly managed
Consider IP restrictions for sensitive applications
For sensitive development environments, add basic authentication:
// Example: Express.js with basic auth
const express = require('express');
const basicAuth = require('express-basic-auth');

const app = express();

// Add basic authentication
app.use(basicAuth({
    users: { 'dev': 'password123' },
    challenge: true
}));

// Your app routes
app.get('/', (req, res) => {
    res.send('Hello World!');
});

app.listen(3000);
Limit access to specific IP addresses:
# config.yml with IP restrictions
tunnel: your-tunnel-id
credentials-file: /path/to/credentials.json

ingress:
  - hostname: secure-dev.yourdomain.com
    service: http://localhost:3000
    originRequest:
      ipRules:
        - ip: 192.168.1.100/32
          action: allow
        - ip: 0.0.0.0/0
          action: deny
  - service: http_status:404
Error: dial tcp 127.0.0.1:3000: connect: connection refused
Solutions:
Verify your local app is running: curl http://localhost:3000
Check the port number in your config
Make sure your app binds to 0.0.0.0:3000 not just 127.0.0.1:3000
Error: dns: no such host
Solutions:
Wait up to 24 hours for DNS propagation
Check DNS with: nslookup dev.yourdomain.com
Verify CNAME record exists in Cloudflare DNS
Try accessing from a different network or use a VPN
Error: failed to request Cloudflare Tunnel connection
Solutions:
Re-run cloudflared tunnel login
Check credentials file path in config.yml
Verify tunnel ID is correct
Ensure domain ownership in Cloudflare
Error: Certificate warnings in browser
Solutions:
Set Cloudflare SSL mode to "Full" or "Flexible"
Wait a few minutes for SSL provisioning
Clear browser cache
Check that you're using https:// not http://
Choose Closest Cloudflare Data Center: Cloudflare automatically routes to the nearest location
Enable Argo Smart Routing (paid feature): Routes traffic via fastest paths
Use HTTP/2: Cloudflare enables this automatically
Enable Brotli Compression: Available in Cloudflare dashboard
# Development-optimized config
tunnel: your-tunnel-id
credentials-file: /path/to/credentials.json

ingress:
  - hostname: dev.yourdomain.com
    service: http://localhost:3000
    originRequest:
      connectTimeout: 30s
      tlsTimeout: 30s
      tcpKeepAlive: 30s
      keepAliveTimeout: 90s
  - service: http_status:404
Check if your tunnel is running:
# List all tunnels
cloudflared tunnel list

# Show tunnel info
cloudflared tunnel info my-dev-tunnel

# View tunnel logs
cloudflared tunnel --loglevel debug run my-dev-tunnel
Access detailed analytics in your Cloudflare dashboard:
Traffic volume: Requests per day/hour
Response codes: Success/error rates
Geographic distribution: Where your users are located
Bandwidth usage: Data transfer statistics
| Solution | Setup Time | Monthly Cost | Custom Domain | HTTPS | Bandwidth |
| Cloudflare Tunnel | 10 minutes | Free | ✅ | ✅ | Unlimited |
| ngrok Pro | 2 minutes | $8-$20 | ✅ | ✅ | Limited |
| Serveo | 1 minute | Free | ❌ | ✅ | Limited |
| Port Forwarding | 30+ minutes | ISP costs | ✅ | Manual | ISP limited |
Separate Tunnels for Different Projects: Create individual tunnels for each project
Use Descriptive Subdomains: api-v2.yourdomain.com instead of test.yourdomain.com
Version Your Configurations: Keep config files in version control
Document Team Access: Share tunnel URLs with team members
# Organize multiple tunnel configs
mkdir ~/.cloudflared/projects/
mkdir ~/.cloudflared/projects/ecommerce/
mkdir ~/.cloudflared/projects/blog/

# Use project-specific configs
cloudflared tunnel --config ~/.cloudflared/projects/ecommerce/config.yml run ecommerce-tunnel
# Development
dev-api.yourdomain.com -> localhost:3000

# Staging
staging-api.yourdomain.com -> localhost:3001

# Feature branches
feature-auth.yourdomain.com -> localhost:3002
Cloudflare Tunnel transforms localhost development from a local-only experience to a globally accessible, production-like environment. Whether you're:
Sharing work with clients without deploying half-finished features
Testing webhooks from external services
Collaborating with remote team members on localhost applications
Developing mobile apps that need to connect to your local API
Learning web development and want to show friends your projects
This setup provides enterprise-grade features (custom domains, HTTPS, global CDN, DDoS protection) at zero cost, with a setup time of just 10 minutes.
The days of "works on my machine" are over. With Cloudflare Tunnel, your machine works everywhere.
# 1. Install cloudflared
brew install cloudflared  # or download for your OS

# 2. Authenticate
cloudflared tunnel login

# 3. Create tunnel
cloudflared tunnel create my-tunnel

# 4. Configure DNS
cloudflared tunnel route dns my-tunnel dev.yourdomain.com

# 5. Run tunnel
cloudflared tunnel run my-tunnel
Total time: Under 10 minutes
Total cost: $0
Result: Professional localhost hosting with your custom domain
Ready to make your localhost globally accessible? Your development workflow will never be the same! 🚀
Have questions about specific frameworks or need help with advanced tunnel configurations? Drop a comment below or connect with me on social media. Happy tunneling!